UNIX/Linux ↔ Windows/DOS end-of-line characters
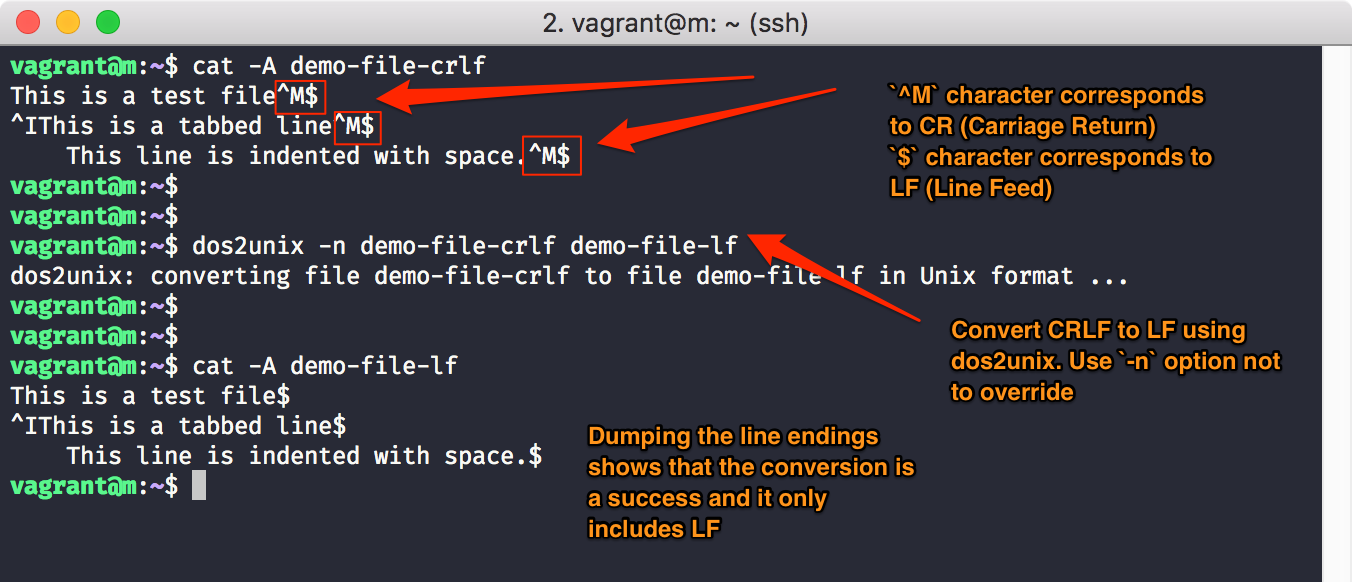
While all UNIX-like operating systems use Linefeed (LF) as end-of-line character for ages, Microsoft decided for MS-DOS (and thus Windows to date) to follow another standard by using a two-byte combination of carriage return and line feed (CR/LF, also written as \r\n).
That's why even plain text files can be troublesome if copied 1:1 from a windows machine to a Linux/UNIX system.
When trying to submit such wrongly-formatted job script, a typical error is:
[E] sbatch: error: Batch script contains DOS line breaks (\r\n)
    sbatch: error: instead of expected UNIX line breaks (\n).
As shown, with “cat -A textfile” you can determine whether a problematic text file is such a former windows file, and convert it using “dos2unix textfile” to be a correct Linux text file.
Displaying Graphical Results
In case you want to display graphical output (eg. in PNG or JPG formats) or use programs with GUIs, there are several ways to get them to work remotely.

Via X11 Forwarding
The oldest and slowest protocol for programs on *nix/Linux systems to display their window remotely, ie. via the network on another computer.
For visualization of graphical (or even three-dimensional) result files, this X11 forwarding is by all means the worst method, since large uncompressed bitmaps have to travel through the slow X11 channel (see right).
- Make sure you have a X server running on your local Laptop/PC (Linux/MacOS: built-in, Windows: eg. vcXsrv). This program “receives” and displays the windows of remote programs.
- Enable “X11 forwarding/proxying” in your
sshprogram, or run command linesshclients with the option-X
This is the only way of using GUI programs on the login nodes.

Using sshfs
A better method to visualize graphical result files is to make the cluster-wide shared HPC file system available using “ssh file system” as if it was a local disk, comparable to mounting a network drive.
Details can be found down below under “file transfer”.
This way, only the still compressed image files are transferred through the sshfs network channel, and are decompressed and displayed only on your local Laptop/PC.
Specialized Viewer
For some data intensive formats, you can use specialized viewers like ParaView:
ParaView was developed to analyze extremely large datasets using distributed memory computing resources. It can be run on supercomputers to analyze datasets of tera-scale as well as on laptops (for smaller data).
Mostly, such visualizers consist of a client/server architecture with a separate network connection.
The “server” component will be run on the cluster's login node, and the graphical “client” or “visualizer” on your Laptop/PC. Both connect to each other via network, and the server (controlled by the client) sends the chosen visualization in the desired “level of detail”.
Since this network connection by default is neither authenticated nor encrypted, and not set up through ssh (or any other well-known port):
- check whether your data is sensitive (or intellectual property worth protecting) and consequently, use ssh tunneling then
- in case of problems otherwise: check the firewall of your Laptop/PC or the one protecting your institute's network for those ports used by the visualizer.
File transfer to and from the Lichtenberg HPC
Before and after calculations, your data needs to get on and your results to get off the Lichtenberg filesystems.
Use the login nodes for your transfers, as these have high bandwidth network ports also to the TU campus network (we do not have any other special input/output nodes).
We recommend the following tools:
One-off: scp (or sftp)
As you can log in via ssh to the login nodes, you can also use SSH's scp (and sftp) tools to copy files and directories from or to the Lichtenberg.
In case of (large) text/ASCII files, you should use the optional compression (-C) built into the SSH protocol, in order to save network bandwidth and to possibly speed up your transfers.
Omit compression when copying already compressed data like JPG images or videos in modern container formats (mp4, OGG).
Example:
tu-id@logc0004:~ $ scp -Cpr myResultDir mylocalworkstation.inst.tu-darmstadt.de:/path/to/my/local/resultdir
Details: man scp.
Fault tolerance: none (when interrupted, scp will transfer everything afresh, regardless what's already in the destination).
Repeatedly: rsync
Some cases, ie. repeating transfers, are less suitable for scp.
Examples: “I need my calculations' results also on my local workstation's hard disk for analysis with graphical tools” or “My local experiment's raw data need to hop to the HPC for analysis as soon as it is generated”.
As soon as you have to keep (one of) your Lichtenberg directories “in sync” with one on your institute's (local) infrastructure, running scp repeatedly would be inefficient, as it is not aware of “changes” and would blindly copy the same files over and over again.
That's where rsync can step in. Like scp, it is a command line tool, transferring files from any (remote) “SRC” to any other (remote) “DEST”ination. In contrast to scp however, it has a notion of “changes” and can find out whether a file in “SRC” has been changed and needs to be transferred at all. New as well as small files will simply be transmitted, for large files however, rsync will transfer only their changed blocks (safeguarded by checksums).
While the initial “rsync”hronisation of a larger directory tree won't be much faster than with “scp -Cr”, any subsequent synchronisation will be finished much more quickly, as only deltas (the changes) are transferred.
In essence: unchanged files are never transferred again, new and changed files will, but for large files, only their changed portions (delta) will be transferred.
Example:
tu-id@logc0004:~ $ rsync -aH myResultDir mylocalworkstation.inst.tu-darmstadt.de:/path/to/my/local/resultdir
Details: man rsync.
Fault tolerance: partly (when interrupted, rsync will transfer only what is missing or not complete in the destination).
Remember: both scp and rsync are “one way” tools only! If--between transfers--a file is changed in “DEST”, the next transfer will overwrite it with the (older) version from “SRC”.
If you want to go “bidirectional”, you may try syncthing or unison.
Network Mount or Mapped Drive Letter
Using the “ssh file system” (sshfs), you can mount / map the HPC file systems locally, as a “network mount” (or “network drive letter”):
- create a local directory per target file system on your Laptop/PC:
mkdir HPC-home HPC-scratch - Linux/MacOS
sshfs lclusterXX: HPC-home(corresponds to your$HOMEon the cluster)sshfs lclusterXX:/work/scratch/TU-ID HPC-scratch - Windows:
Install & configure WinFsp and SSHFS-Win accordingly
These (mounted or mapped) “HPC-…” directories (or drive letters provided by “SSHFS-Win”) now allow for a convenient (bidirectional) access to your HPC files.
Unlike NFS/(4) or SMB (Windows), this does not require any changes in firewalls.
Problems
If you can log in to a shell (interactively), yet any file transfer fails, consult our FAQ “I can't upload files!”.
Not available on the Lichtenberg:
HTTP(S), SMB (CIFS), rcp and other older, unencrypted protocols.
Standard In, Out and Err
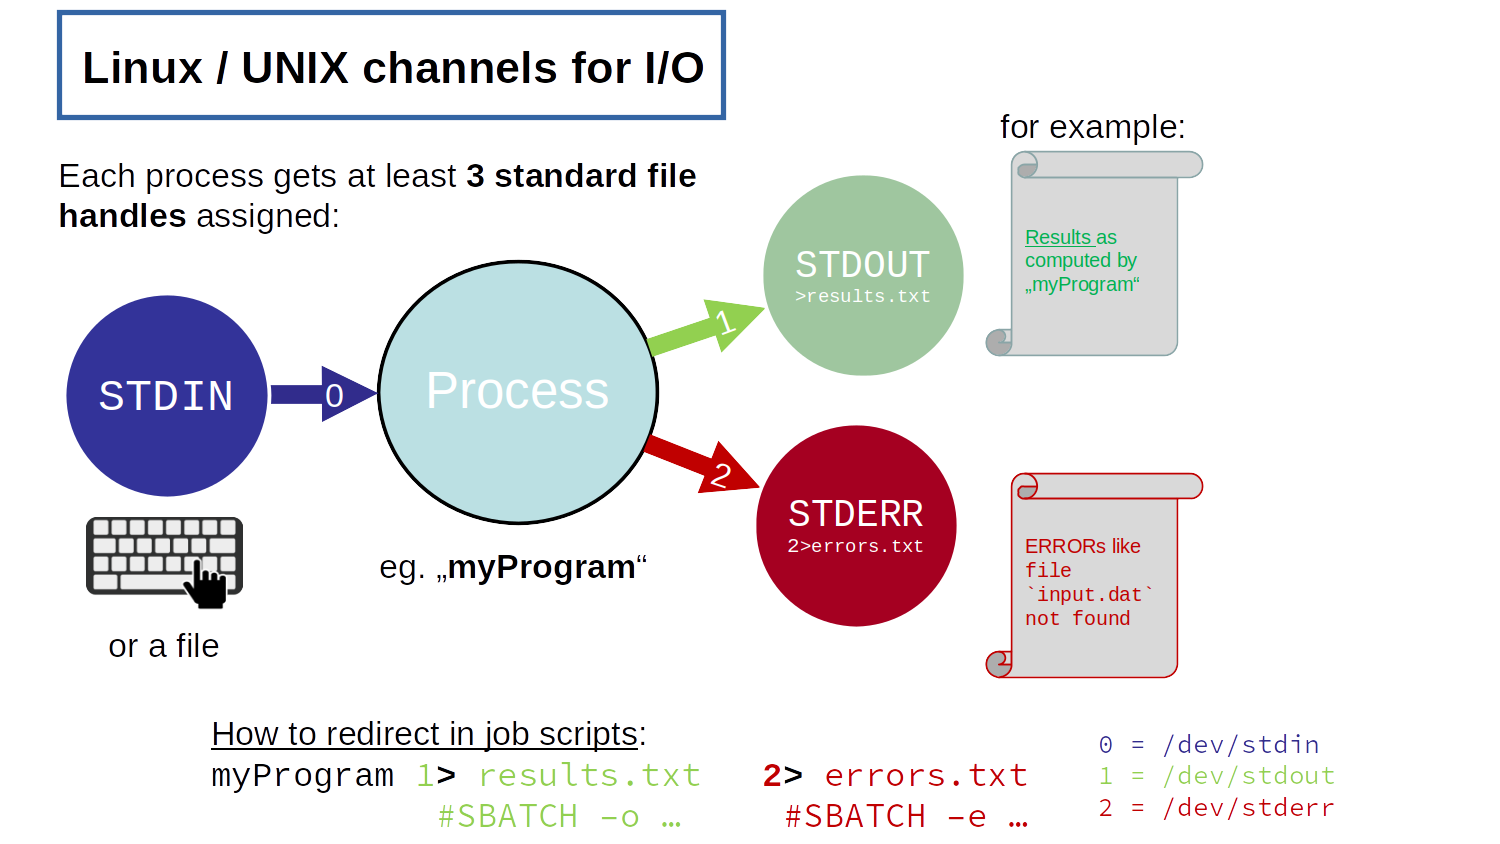
The default in- and output channels in Linux (and other unixoid operating systems).
STDIN – standard input (usually, your keyboard – or a file)
STDOUT – standard output (usually, your terminal)
STDERR – standard error (usually, your terminal, too)
As shown in the picture, with -o und -e Slurm can redirect both output channels into (separate) files.
Using placeholders (%.), even hundreds of different jobs ran from the very same job script will get unique and distinct file names:
%j – job ID
%x – Name of job (from #SBATCH -J myJobName)
%N – host name of executing compute node
%A – job ID of an array job
%a – task ID of an array job's sub task
(for more details, see “man sbatch” under “filename pattern”)
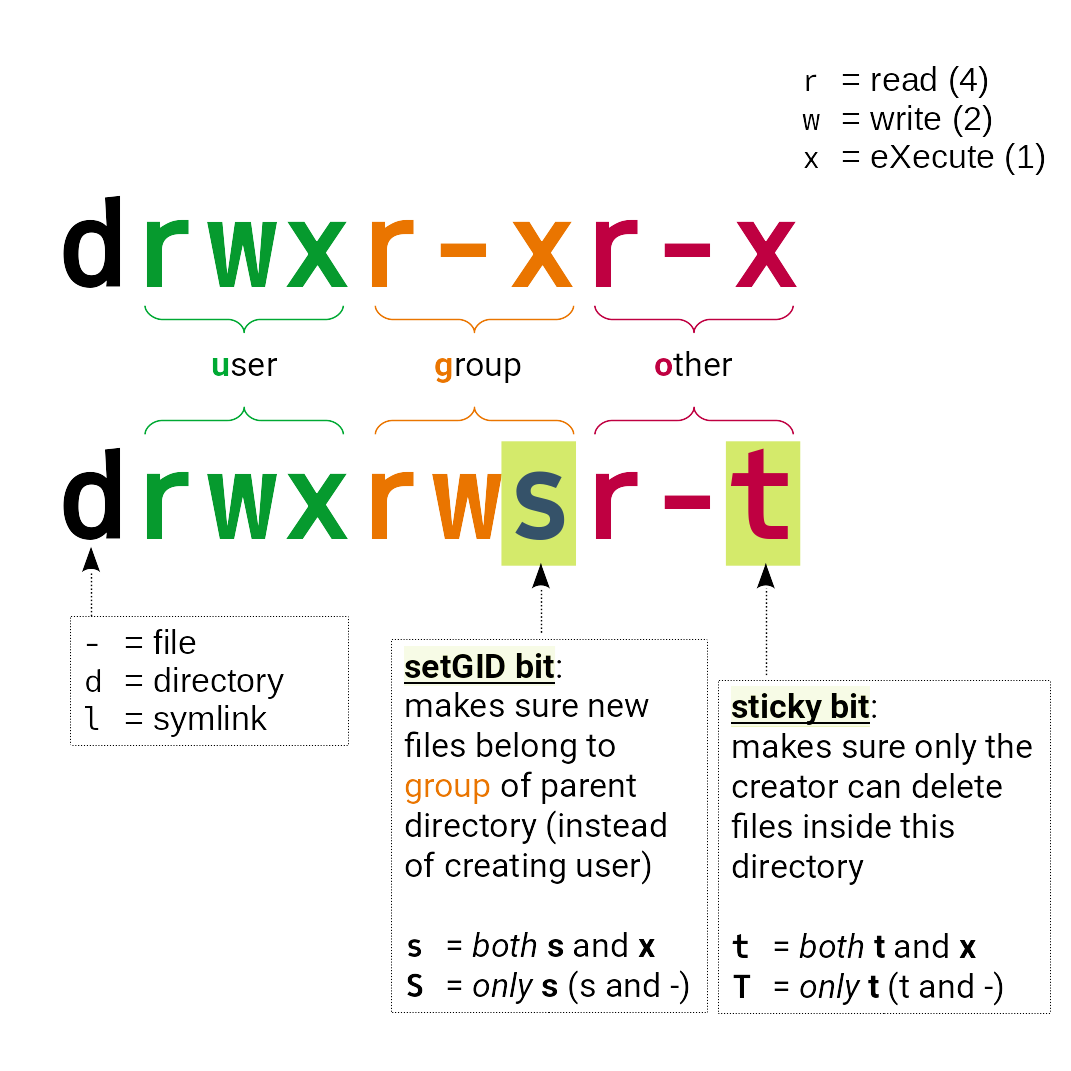
Access Rights for Directories and Files
From user/owner over group and “all others”, you can control
- whether your files can be read or written, and whether a file should become executable (ie. used like a command),
and - how other users can access your directories and files.
(more in “man chmod”).