
Frequently Asked Questions – batch scheduling system
Preparing Jobs
The batch scheduler needs to know some minimal properties of a job to decide which nodes it should be started on.
If for example you would not specify --mem-per-cpu=, a task requiring very large main memory might be scheduled to a node with too little RAM and would thus crash.
To put it another way: with the resource requirements of all user jobs, the scheduler needs to play kind of “multidimensional tetris”. At least along the dimensions runtime, memory size and no. of CPU cores, the scheduler places your jobs as efficiently and as gap-free as possible into the cluster. (In the background, many more parameters are used.)
These three properties of a job are thus the bare minimum to give the scheduler something to schedule with.
Yes, that is possible with the parameter “--test-only” for “sbatch”:
sbatch --test-only submit_tests
[E] sbatch: Job 12…78 to start at yyyy-mm-ddThh:mm:ss using XX processors on nodes mpsc[000y-000z] in partition PPPP
If you get back this kind of message, Slurm would accept this job script, and would run the job most likely at the given time (estimated!).
While apparently classified as an error (“[E] …”), the output given above is no real one.
In case you forgot to specify a required parameter, the output would instead look like:
[E] Missing runlimit specification – Use --time=<[hh:]mm>If sbatch <jobscript> complains about missing (mandatory) parameters, even though all these seem to be defined using
#SBATCH …
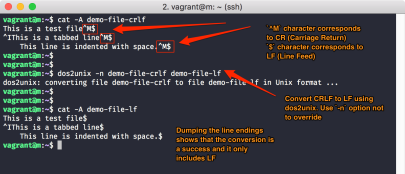
pragmas, this may be caused by Windows linefeeds, which will not considered to be valid on UNIX/Linux.
If you wrote your job script on your windows PC/laptop and transferred it with scp to a login node, simply transform it with
dos2unix jobscriptfileto a valid UNIX/Linux text file.
If above errors remain even after that, check all minus/hyphen characters. Here, you could have introduced dashes (long) or em-dashes (even longer), which do not work as “begin of a parameter” sign.
Before submitting jobs, you need to determine how many CPUs (= cores) you want (best) to use, how much main memory your scientific program will need and how long the calculating will take.
If your scientific program is already used in your group for problems like yours, you can ask your colleagues about their lessons learned.
If you start afresh with a new scientific program package or a new class of problems: prepare a comparably small test case (not more than 30 minutes runtime), and run it on one of the login nodes (with the desired number of cores) under the control of the UNIX "time" command as follows:
/bin/time --format='MaxMem: %Mkb, WCT: %E' myProgram <testcase>After the run, you get for example
- MaxMem: 942080kb, WCT: 1:16.00
on your STDERR channel.
After dividing “MaxMem” by 1024 (to get MBytes), you can determine your #SBATCH --mem-per-cpu= for that test case as
MaxMem in MByte
-----------------    (plus a safety margin)
# of cores used
Your #SBATCH -t d-hh:mm:ss is then the “WCT” from above (plus a safety margin).
In our example and if you have used 4 cores:
 942080 / 1024 / 4 =
--mem-per-cpu=230
When you have run your test case with 2, 4, 8 and 16 CPU cores, you can roughly guess the scalability of your problem, and you can size your real job runs accordingly.
In a short hierarchy: The HPC cluster consists of
- compute nodes
single, independent computers like your PC/Laptop (just more hardware and performance)
A node consists of- two or more CPUs (central processing units, or processors), placed in a socket.
CPUs are the “program executing” part of a node.
A CPU consists of- several cores, which can be understood as distinct execution units inside a single CPU.
The more cores, the more independent processes or execution threads can be run concurrently.
Each core can either be used by- a process = task (MPI)
or - a thread (“multi-threading”), eg. POSIX threads or most commonly OpenMP (Open MultiProcessing)
- a process = task (MPI)
- several cores, which can be understood as distinct execution units inside a single CPU.
- two or more CPUs (central processing units, or processors), placed in a socket.
A pure MPI application would start as many distinct processes=tasks/MPI ranks as there are cores configured for it. All processes/tasks communicate with each other by means of MPI.
Such applications can use one node, or can be distributed over several nodes, the MPI communication then being routed via the Interconnect (Infiniband).
A pure multi-threaded application starts one single process, and from that, it can use several or all cores of a node with separate, (almost) independent execution threads. Each thread will optimally be allocated to one core.
Most recent programs use OpenMP for that (see $OMP_NUM_THREADS in the documentation of your application).
Such applications cannot be distributed across nodes, but could make use of all cores on a given node.
Hybrid applications mix both parallelization models, by running eg. as many processes = tasks as there are nodes available, and each process spawning as many threads as there are cores on each node. Threads communicate swiftly by means of their common main memory inside a node, whereas the distinct processes cross the node barrier by means of MPI over the Interconnect (Infiniband).
For historical reasons from the pre-multicore era, SLURM has parameters referring to CPUs (eg. --mem-per-cpu=).
Today, this means cores instead of CPUs! Even if that's confusing, the rule simply is to calculate “--mem-per-cpu” as if it was named “--mem-per-core”.
For running a lot of similar jobs, we strongly discourage from fiddling with shell script loops around sbatch / squeue. For any amount of similar jobs >20, use Slurm's Job Array feature instead.
Using job arrays not only relieves the Slurm scheduler from unnecessary overhead, but allows you to submit much more ArrayTasks than distinct jobs!
Example use cases are:
- the same program, the same parameters, but lots of different input files
- the same program, the same input file, but lots of different parameter sets
- a serial program (unable to utilize multiple cores [multi-threading] or even several nodes [MPI]), but a lot of input files to analyze, and none of the analyses depends on results of any other, aka High-Throughput Computing
Rename the “numerous” parts of your job with consecutive numbering, eg. image1.png, image2.png or paramSet1.conf, paramSet2.conf etc.
Let's say you have 3124 sets, then set up a job script with
_______________
#SBATCH -a 1-3124
myProgram image$SLURM_ARRAY_TASK_ID.png > image$SLURM_ARRAY_TASK_ID.png.out
_______________
and submit it via sbatch. Slurm will now start one job with 3124 ArrayTasks, each one reading its own input image and writing to its own output file.
Even for the output/error file names specified with “-o” and “-e”, you can use “%. placeholders provided by Slurm:
#SBATCH -o /path/to/my/dir/out_%A_%a.txt
#SBATCH -e /path/to/my/dir/err_%A_%a.txt
%A = $SLURM_ARRAY_JOB_ID (the parent job id – same for all array tasks)
%a = $SLURM_ARRAY_TASK_ID (the distinct counting number of each individual array task)
If you need to limit the number of ArrayTasks running concurrently/in parallel, use
#SBATCH -a 1-3124%10
Slurm will then run at most 10 tasks at the same time.
Further details can be found in 'man sbatch' under ”--array=", or on the Slurm website.
If your (simulation) program is capable of “checkpoint/restart” (CPR), you can solve this problem too, using a serial job array.
Configure your program to regularly write out a so-called “state file” to /work/scratch/…/, containing the intermediary state of affairs.
On the one hand, this protects your job from losing all results computed so far in case of hardware problems, ie. crashing of one of the compute nodes running your job.
Your program then does not need to start all over, but can continue with what it reads from the last “state file”.
On the other hand, this allows you to extend your simulation's run time almost at will (way beyond the 7 days maximum), by creating a suite of one-day jobs, executed strictly serially.
Though each one would be killed after 24h (TIMED OUT), the serial array will follow suit and start the next job, picking up the “state file” from its predecessor and continuing for the next 24h.
Let's assume your simulation needs an estimated run time of 19 days. The following array creates 19 distinct, strictly serial one-day jobs (one running after the other):
_______________
#SBATCH -a 1-19%1
#SBATCH -t 1-
srun mySimulationProg …
_______________
The parameter %1 (adjacent to the array indexes) directs Slurm to never run more than one of the arrays jobs at a time.
After submitting, Slurm will start up the first Job, killing it 24h later, and starting the next one, all the way up to day 19.
Further details can be found in 'man sbatch' under “--array=”, or on the Slurm website.
Many scientific programs allow you to specify the amount of CPU cores to use, or the amount of GPU cards to use.
Instead of editing the command line of your scientific program (or its input files) over and over again, just to adapt it to what you request in # of CPU cores or # of GPUs, you can make use of Slurm variables set at job allocation (“starting the job”).
If for example your program is multi-threaded and uses OpenMP, you can write your job script as
_______________
#!/bin/bash…#SBATCH -c ##export OMP_NUM_THREADS=$SLURM_CPUS_PER_TASK/path/to/my/scientificProgram …_______________
This way, it will always use exactly the amount of CPU cores you requested with “-c ##”.
Likewise, when using GPUs and your program's documentation explains to set eg. “--num-devices=#” to tell how many GPUs to use, you can specify
_______________
#!/bin/bash…#SBATCH --gres=#/path/to/my/scientificProgram --num-devices=$SLURM_GPUS_ON_NODE … _______________
This way, you just need to adapt the #SBATCH lines with “-c ##” or “--gres=#”, and your programs automatically “inherit” the exact settings.
(Please don't take # literally – replace it by the desired number of resources.)
Use the “--multi-prog” option of srun, allowing you to run distinct and different programs from within one allocation (=job).
_______________ #!/bin/bash #SBATCH … module purge module load mod1 mod2 srun … --multi-prog myCtrlWorker.conf_______________The file myCtrlWorker.conf needs to follow the scheme
No /path/to/program <parameter>and contains per line the definition of which MPI rank (“No” ⇦ #SBATCH --ntasks=XX) exactly does what, and with which parameters.
In case the “worker” instances of your program need to know their own number, you may use the placeholders “%t” or “%o”, respectively (see ' man srun' under MULTIPLE PROGRAM CONFIGURATION).
Example
… for one controller controlling 24 workers:
_______________ # MPI rank, then path to binary 1 /path/to/controller_program <parameter for controller> 2-25 /path/to/worker_program <parameter for worker, eg. WorkerID=%o>_______________With these two effective lines in myCtrlWorker.conf (the first one is a comment), the srun will first (1) start the controller, followed by 24 separate (2-25) “worker” instances, learning their own number by the %o placeholder.
Example
… for an arbitrary number of workers (only determined by #SBATCH --ntasks=XX):
_______________ # MPI rank, then path to binary 1 /path/to/controller_program <parameter for controller> * /path/to/worker_program <parameter for worker, eg. WorkerID=%o>_______________The * is the wildcard for “anything from 2 onwards”.
For how exactly these controller and worker processes “find and talk to each other” in main memory and which parameters this requires, please see your program's documentation.
Yes. By specifying ie.
#SBATCH --mail-type=FAIL,ENDin your job script, you can get mails about failed or ended jobs.
We do not recommend to use
#SBATCH --mail-user=your@email.address.herebecause
- our system finds out the standard mail address of your TU-ID automatically
- typos or errors in your@email.address.here (for example specifying it surrounded by angle brackets like
<…>) always lead to misrouted mailings or bounces, causing unnecessary support tickets on our end. - if you would use your private mail address here (even more strongly recommended not to do so!), the mail flood of a lot of jobs could trigger our TUDa mail servers becoming spam-blocked by your private mail provider. This would not only block your mails, but all mails from any TU address to your private mail provider – imagine this for
@gmail.comor@web.de…!
With this error message, Slurm refuses to accept your batch request when you specify a non-existing or an expired project, or one you are not (yet) member of.
- check whether you are already “
member” of this project - check your environment for older project references:
env | grep ACCOUNT
If there is a setting like “SBATCH_ACCOUNT=<expired project>”, it will take precedence over what you specified with “#SBATCH -A …” lines.
If all that does not apply, you might be trying to submit way too many single batch jobs.
Then, use job arrays (see above), instead of choking the scheduler with too many distinct jobs.
Pending Jobs
The priority values shown by slurm commands like “squeue” or “sprio” are always to be understood as relative to each other, and in relation to the current demand on the cluster. There is no absolute priority value or “threshold”, from which jobs will start to run unconditionally.
During light load (=demand) on cluster resources, a low priority value might be sufficient to get jobs to run immediately (on free resources). On the other hand, even a very high priority value might not suffice if cluster resources are scarce or completely occupied.
Since most cluster resources are dedicated to the default job runtime of 24 hours, you should always factor in a minimum pending time of a half or one day.
With the command “squeue --start”, you can ask the scheduler for an estimate of when it deems your pending jobs runnable.
Please be patient when getting back “N/A” for quite a while, as that is to be expected. Since the scheduler does not touch every job in every scheduling cycle, it might take its time to reach even this “educated guess” on your pending jobs.
In general, your jobs' time spent in PENDING depends not only on your jobs' priority value, but mainly on the total usage of the whole cluster. Hence, there is no 1:1 relationship between your jobs' priority and their prospective PENDING period.
On the Lichtenberg HPC, the scheduler dispatches the jobs in the so-called “Fair Share” mode: the more computing power you use (especially in excess of your monthly project budget), the lower will be your next jobs' priority.
However, this priority degradation has a half-life of roughly a fortnight, so your priority will recover over time.
Your best bet is thus to use your computing budget evenly over the project's total runtime (see 'csreport'). This renders your priority degradation to be quite moderate.
For a planned downtime, we tell the batch scheduler in advance when to end job execution. Based on your job's runtime statement (#SBATCH -t d-hh:mm:ss in the job script), the scheduler decides whether a given job will safely be finished before the downtime, and will start it.
Pending jobs not fitting in the time frame until the downtime will not be started, and simply remain pending.
All pending jobs in all queues will survive (planned) downtimes or outages, and will afterwards recommence being scheduled as usual, according to their priorities.
Running Jobs
Check whether all directories mentioned in your job script are in fact there and writable for you.
In particular, the directory specified with
#SBATCH -e /path/to/error/directory/%j.errfor the STDERR of your jobs needs to exist beforehand and must be writable for you.
SLURM ends the job immediately if it is unable to write the error file (caused by a missing target directory).
Due to being a “chicken and egg” problem, a construct inside the job script like
#SBATCH -e /path/to/error/directory/%j.err
mkdir -p /path/to/error/directory/
cannot work either, since for Slurm, the “mkdir” command is already part of the job. Thus, any of “mkdir”s potential output (STDOUT or STDERR) would have to be written to a directory which at begin of the job does not yet exist.
Make sure the relevant modules are loaded in your job script.
While you can load those modules right when logging in on the login node (since these are inherited by “sbatch myJobScript”), this is not reliable. Instead, it renders your jobs dependent on what modules you happen to have loaded in your login session.
We thus recommend to begin each job script with
_______________
module purge
module load <each and every relevant module>
myScientificProgram …_______________to have exactly those modules loaded which are needed, and not more.
This also makes sure your job is reproducible later on, independently of what modules were loaded in your login session at submit time.
This ususally is caused by nested calls to either srun or mpirun within the same job. The second or “inner” instance of srun/mpirun tries to allocate the same resources as the “outer” one already did, and thus cannot complete.
1. Script instead of Binary:
If for example you have
srun /path/to/myScientificProgramin your job script, check whether “/path/to/myScientificProgram” in fact is an MPI-capable binary. Then, the above syntax is correct.
But if myScientificProgram turns out to be a script, calling srun or mpirun by itself, then remove the srun in front of myScientificProgram and run it directly.
2. Allocation per #SBATCH and per 'srun':
Such inadvertent “loop” is also a job script with two allocations: the “outer” one per #SBATCH -n 16 and the “inner” one with srun -n 16:
#SBATCH -n 16…srun -n 16 … /path/to/myScientificProgramIn that case, simply remove the “-n 16” from the 'srun' command. The notable advantage of srun in contrast to mpirun is precisely its ability to know from Slurm all about the job, and to “inherit” everything right away.
Example of such error:
srun: Job XXX step creation temporarily disabled, retrying
srun: error: Unable to create step for job XXX: Job/step already completing or completed
srun: Job step aborted: Waiting up to 32 seconds for job step to finish.
slurmstepd: error: *** STEP XXX.0 ON hpb0560 CANCELLED AT 2020-01-08T14:53:33 DUE TO TIME LIMIT ***
slurmstepd: error: *** JOB XXX ON hpb0560 CANCELLED AT 2020-01-08T14:53:33 DUE TO TIME LIMIT ***Under SLURM, OpenMPI has an issue with respect to this MPI_Comm_spawn() routine (to later start further MPI ranks): it does not work.
If your program absolutely requires MPI_Comm_spawn(), you can just try to switch to another MPI implementation like “intelmpi”.
Example:
[mpsc0111:1840264] *** An error occurred in MPI_Comm_spawn[mpsc0111:1840264] *** reported by process [2377252864,38][mpsc0111:1840264] *** on communicator MPI_COMM_SELF[mpsc0111:1840264] *** MPI_ERR_SPAWN: could not spawn processes[mpsc0111:1840264] *** MPI_ERRORS_ARE_FATAL (processes in this communicator will now abort,[mpsc0111:1840264] *** and potentially your MPI job)There is no magic by which Slurm could know the really important part or line of your job script. The only way for Slurm to detect success or failure is the exit code of your job script, not the real success or failure of any program or command within it.
The exit code of well-written programs is zero in case everything went well, and >0 if an error has occurred.
A script's exit code is the exit code of its last command.
Imagine the following job script:
_______________
#!/bin/bash
#SBATCH …
myScientificProgram …
_______________
Here, the last command executed is in fact your scientific program, so the whole job script exits with the exit code (or status) of “myScientificProgram” as desired. Thus, Slurm will assign COMPLETED if “myScientificProgram” has had an exit code of 0, and will assign FAILED if not.
If you issue just one simple command after “myScientificProgram”, this will overwrite the exit code of “myScientificProgram” with its own:
_______________
#!/bin/bash
#SBATCH …
myScientificProgram …
echo “Job finished”_______________Now, the “echo” command's exit code will become the whole job's exit code, since it is the last command of the job script. If the “echo” command succeeds (as it most certainly does), Slurm will assign COMPLETED even though “myScientificProgram” might have failed – the “echo”'s success covers up the failure of “myScientificProgram”.
To avoid that, save the exit code of your important program before executing any additional commands:
_______________
#!/bin/bash
#SBATCH …
myScientificProgram …
EXITCODE=$?
/any/other/job/closure/cleanup/commands …
echo “Job finished”
exit $EXITCODE
_______________
Immediately after executing “myScientificProgram”, its exit code is saved to $EXITCODE, and with its last line, your job script can now re-set this exit code (the one of your real “payload”).
That way, Slurm gets the “real” exit code of “myScientificProgram”, not just the one of the command which happens to be the last line in your job script, and will set COMPLETED or FAILED appropriately.
If you want to keep an eye on the real runtimes of your jobs, you can record this with just a one-liner to your STDERR channel (written to the file specified with “#SBATCH -e …”):
_______________
#SBATCH …
/usr/bin/date +“Job ${SLURM_JOBID} START: %F_%T.%3N” >&2
module purge
module load module1 module2 module3 …
/path/to/my/scientific/program …
EXITCODE=$?
/usr/bin/date +“Job ${SLURM_JOBID} END: %F_%T.%3N” >&2
exit ${EXITCODE}
_______________
Without any further ado like extra “echo” lines, the “date” command tells you the exact start and end times of your “payload”.
For further details on the % placeholders for the different date and time components please consult the 'man date' page unter “FORMAT controls”.
Only during runtime of your own job(s), and only those nodes executing your own job(s).
Details can be found in our “SLURM section (opens in new tab)”.
Miscellaneous
In our “Miscellaneous and Linux” section, we explain how to access GUI programs and how best to display graphical results.
If you want to be notified about status changes of your job(s) by mail, you write
#SBATCH --mail-type=…in your job script and set … to BEGIN or END or FAIL or ALL, respectively. The scheduler will then send the respective mails to you.
Since all jobs are inextricably linked to your login name, ie. your TU-ID, we have configured Slurm to always send these mails to your current TU-ID mail address. We do not store it somewhere, instead Slurm asks the central IDM system of the TU.
So even if you change the mail address associated with your TU-ID, all scheduler mails will instantaneously go to the (new) target address.
Similar to our compute nodes, the login nodes are not installed the usual way on hard disks. Instead, they fetch an OS image from the network each reboot (thus, also after downtimes) and extract the OS “root” image into their main memory.
That assures these nodes being in a clean, defined (and tested) condition after each reboot.
Since “cron”- und “at” entries are stored in the system area being part of that OS image, these entries would not be permanent and are thus unreliable.
To avoid knowledgeable users creating “cron” or “at” jobs nonetheless (and inherently trusting their function for eg. backup purposes), we have switched off “cron” and “at”.
In these directories, permissions are managed using UNIX groups named after your ProjID>.
Files (and directories) not belonging to the pertaining group or not having the right permissions will be unavailable to other group members.
Directories and files somewhere below of /work/projects/:
- need to have the right group membership of
<PrjID>(and may not belong to your TUID group) - directories need to have permissions as follows:
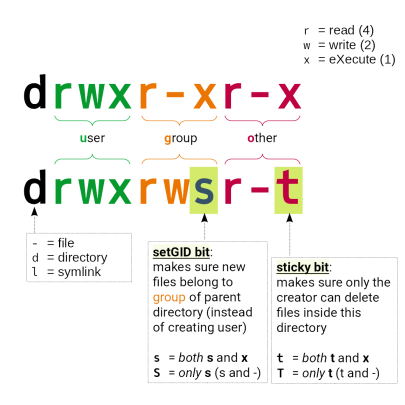
drwxrws---
The “sticky” bit on group level cares for new files to be automatically assigned the group of the parent directory (not the group of the creating user)
Wrong: drwx------ 35 tuid tuid 8192 Jun 17 23:19 /work/projects/…/myDir
Right: drwxrws--- 35 tuid <PrjID> 8192 Jun 17 23:19 /work/projects/…/myDir
Solution:
Change into the parent directory of the problematic one, and check its permissions as described above, using
ls -ld myDir
In case these are not correct and you are the owner:
chgrp -R <PrjID> myDir
chmod 3770 myDir
In case you are not the owner, ask the owner to execute the above commands.
From time to time, we will revise and edit this web page.
Please send us your question or suggestion via email to hhlr@hrz.tu-…, and if question & answer are of general interest, we will amend this FAQ accordingly.