Unlike in Hessenbox DA, you can also share subfolders and individual files in next.Hessenbox.
Grant permissions
Step 1
To share a folder or file, click on the ‘Show sharing options’ icon (human icon with a plus sign) next to the three dots in its column.
If the sharing icon is not visible due to the window size, click on the three dots and then on ‘Show sharing options’.

Step 2
Click in the ‘Search for release recipients’ field.

Grant access to a person with TU-ID
Enter the e-mail address or the name of the person to whom you want to grant access. If this person is already known in the system (the person has already logged in to next.Hessenbox once or has been added to the contacts by you), they will be displayed in the suggestion list. People who are not (yet) known in the system must be invited via the e-mail address.
Grant access to a person from another university (that is connected to next.Hessenbox)
Enter the e-mail address or the full account name of the person you wish to grant access to. Please note that autocomplete is not available here. It is also necessary that the person has already logged in to next.Hessenbox in order to be granted access.
Grant access to other persons (guests)
Enter the e-mail address of the person to whom you want to grant access. You then have the option of inviting this person as a guest. The invited person will receive a corresponding e-mail with which they can create an account. You can create your own contacts for people you frequently work with. These will then also appear in the selection lists.
Step 3
As soon as you have selected a user from the suggestion list or entered a valid email address, you can set the sharing permissions for this person.

External recipients can be invited as guests, as described in step 2.

Step 4
The permissions for the folder can be set individually under ‘User-specific settings’. Expand the ‘Advanced settings’ to define additional sharing options.
By ticking the respective option, additional fields will appear where you can make the desired settings.

Share link (‘public shares’)
This option allows you to create a link that you can share. Anyone who receives this link can access the folder or file and use the options that you specify later on. This applies regardless of whether the person has a TU-ID or not.
Step 1
First click on the + symbol. The system prompts you to set an expiry date, which can be a maximum of just over a year in the future.
Step 2
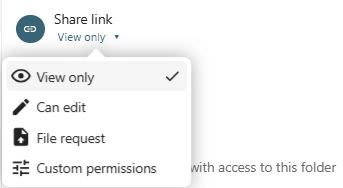
Click on ‘Create share’. The default option for link sharing is that the recipient of the link can view the file. You can copy the link to the clipboard using the copy icon.

If necessary, define the additional permissions that the recipients of the link should receive. Remember that every person who receives this link has the same permissions.
Click on the three dots on the right to make changes or extensions to the share link or to remove the share.

Share options
- Read only to allow viewing and downloading
- Allow upload and editing
- With File drop, the sharee can only upload files to a folder without seeing the files that are already in that folder.
- Hide download hides the download buttons and the default browser right-click options in order to make downloading for the sharee harder
- Password protect
- Set expiration date will automatically disable the share
- Note to recipient
- Unshare to revert the share
- Add another link to create multiple public links with different rights