Manual Linux Mailbox
Customise e-mail

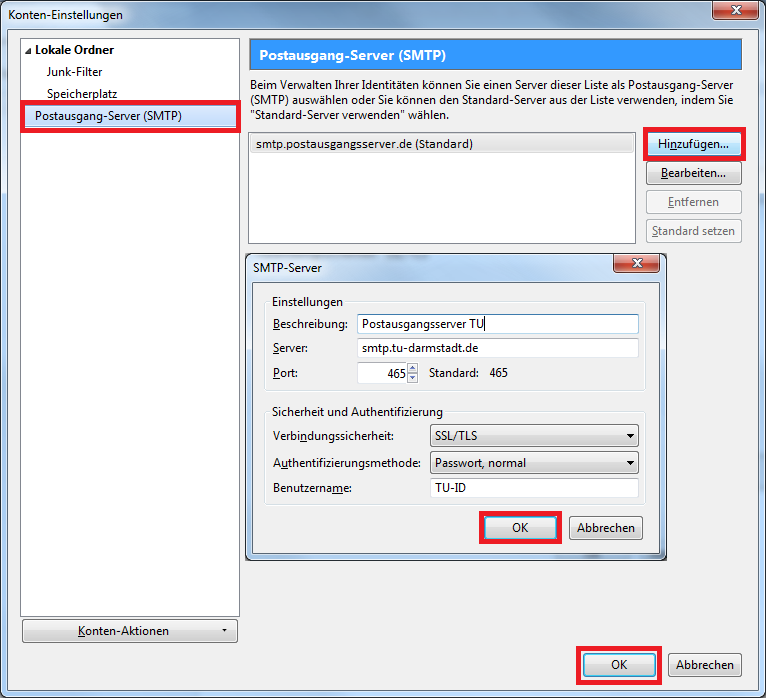
Set up identity for sending

If you have activated the forwarding of e-mails and want to send them from Thunderbird with your e-mail account set up for forwarding under your e-mail address of TU Darmstadt, you can add another identity under Thunderbird. This allows you to select your TU e-mail address in the “From” field when writing a message and send messages under this address.

  • Please right-click on the account for which you have activated forwarding and select “Einstellungen” (Settings).
  • Select “Postausgangsserver” (Outgoing mail server) in the settings on the left side.
  • Click on the button “Hinzufügen” (Add).
  • Now enter the following:
    • Server: smtp.tu-darmstadt.de
    • Port: 465
    • Verbindungssicherheit (Connection security): SSL/TLS
    • Authentifizierungsmethode (Authentication method): Passwort, normal
    • Benutzername (Username): TU-ID
    • Click on “OK” to save.
  • Click “OK” to save and close the account settings.
  • Right mouse click on the account for which you have activated forwarding and select “Settings”.
  • Click on the button “Other identities” in the settings.
  • Now click on “Add”.
  • In the settings of the new identity, enter your name under Name and your e-mail address of TU Darmstadt under E-Mail Address.
  • Now select the previously configured SMTP server smtp.tu-darmstadt.de as your outgoing mail server

To make sure that messages that you write and send under a different identity are sorted in the correct folder, you should configure folders for sent messages, drafts, archived messages or templates.

  • If no folders for sent messages, drafts, archived messages or templates exist yet, you must create them. Click on the right mouse button on the respective email box and click on “New subfolder”. Then enter a name, e.g. “Templates” and click on “OK”.
  • After all folders are created, you can continue with the configuration.
  • Right-click on the account for which you want to subscribe email boxes and select “Add identity…”.
  • Select identity and click on “Edit”.
  • In the window “Configure Identity”, switch to the “Copies & Folders” tab.
  • In “Automatically send messages when sending”, select “Other folder” and specify the location of the sent folder in your letterbox. Follow the same procedure for Archive, Drafts and Templates folders: First select “Other folder” and then specify the appropriate folder in your email box.