
Defect & Error
In case your Athena Card is defective, you can have a new card printed out free of charge at the HRZ Service Centre Stadtmitte and the HRZ Service Centre Lichtwiese.
Please bring the defective card with you for replacement.
This is usually the case if the Athena Card was removed too early from a booking device, e.g. before a booking process could be completed. You must return to the exact same device which created the error and place the card there again until the booking process is completed. The error code shows which device is responsible for the error. The staff of the Student Affairs [Studierendenwerk] at the checkouts of the canteen as well as the staff of the HRZ service counter at Stadtmitte can help you with this.
You can have the credit on your Athena Card by out only by the Studierendenwerk. The exact process is described on the website of the Hochschulgastronomie:http://studierendenwerkdarmstadt.de/hochschulgastronomie/chipkarten/auszahlung-defekter-chipkarten/
After being paid out you can replace your Athena Card with a new one at our service counter.
Lost, exchange and return
If you have lost your Athena Card you should block your readers account at the ULB as soon as possible. Unfortunately, a refund of your credit is not possible.
A new Athena Card can be printed out free of charge at the HRZ Service Centre Stadtmitte and the HRZ Service Centre Lichtwiese.
Please make sure that you have uploaded a photo to the account management system [Accountverwaltung].
Should lost cards be returned to the HRZ Service, we will inform you via the e-mail address entered in the account management system.
Should your card be stolen, you can have a new Athena Card printed out free of charge at the HRZ Service Centre Stadtmitte and the HRZ Service Centre Lichtwiese.
You should block your reading account at the ULB (06151 – 16-76210) immediately.
Unfortunately, it is not possible for the Student Affairs [Studierendenwerk] to pay out the credit.
The Athena Card loses its validity after the retirement from TU Darmstadt (e.g. exmatriculation or termination of employment) and may be destroyed by the user.
If you change your name (whether it is first or last name), you can have a new Athena Card issued free of charge. If your name has already been changed in the internal IDM system, you can simply bring your old Athena card to the service counter. There you can have the new Athena Card issued directly.
Athena Card details
The Athena Card is issued to all students and employees at TU Darmstadt. Click here for further information.
To receive a Athena Card please upload a photo in the user portal. Read more
The Athena Card does not replace the mobility card. It only serves to identify yourself as an employee of the TU Darmstadt at a ticket control. The Mobility Card is only valid in combination with an Athena Card with photo
The Athena Card is only meant for students and employees of TU Darmstadt.
The following people do NOT receive an Athena Card: Part-time lecturers, “Freunde der TU Darmstadt”, visiting researchers, students of other universities and all external people.
If you require a library card for the University and State Library (ULB Card), please contact the staff there. The staff of the canteen checkouts can help you with the chip cards of the Studierendenwerk.
The portrait photograph must be taken face-on and the face must be clearly visible.
The naming of titles, including academic titles, is not provided for on the Athena Card.
Do not sign the Athena Card! The Athena Card is valid without a signature. The thermal printing field will be rendered useless for later operation when signed.
At the Studierendenwerk Darmstadt, only the 17-digit card number (top left on the card) and the status (e.g. “Studierende_r TUD”, “Studierende_r HDA”, “Mitarbeiter_in TUD” or “Mitarbeiter_in Studierendenwerk”) are used when using the Athena card as an electronic purse. All transaction data of the electronic purse are stored for 10 years within the legal retention period for electronic cash register systems and then deleted.
All questions on the topics “Service Groupware”, “Groupware basic supply”, “customer in service groupware / not customer in service groupware” … are answered in this FAQ.
Web mail portal
You can access the mail portal of TU Darmstadt at https://webmail.tu-darmstadt.de.
Instructions for the initial setup of your webmail mailbox can be found here.
If you forgot your password then read on in the paragraph “Help, I forgot my password”. Otherwise, first check whether you have set up an active forwarding for your mailbox in the IDM of TU Darmstadt. To do so, go to the tab Student E-Mail Address. Now activate the radio-button Send E-Mails to my Mailbox at TU Darmstadt. The creation of your mailbox now takes about one hour. Then try to log in again. If this does not solve the problem either, please check your registration data again and then contact the HRZ Service.
As a student you can have a new password sent to you at https://www.idm.tu-darmstadt.de/passwordRecovery.
As an employee, please contact your local administrator.
In the Inbox tab, you can select the mail to be deleted and remove it by clicking Delete. The mail is now displayed as “Deleted” and by clicking on Hide deleted, deleted mails are no longer displayed. With Show deleted, the deleted mails are shown again. To restore a deleted mail, you can select the mail and remove the Deleted mark by clicking Restore. To delete the deleted mails correctly, click on Delete permanently in the lower right corner.
Attention! If you have set that deleted mails should be moved to the trash, then you will need extra storage space to delete mails, because the mail is only marked as Deleted in the inbox, but is additionally copied to the trash. The trash bin also provides additional quota, but this is also limited and therefore filled in at some point.
At the beginning of the month, Webmail may display this message. The standard task of maintenance work is to delete old file attachments from mails. If you are unsure whether you want to perform this action, click Skip maintenance work.
Forwardings
If you would like to forward your student emails from your email inbox to another email address, you can set this up in the webmail interface (see instructions (opens in new tab)). In this case, you are responsible for the correct receipt of the forwarded emails.
Please make sure that you empty your student mailbox regularly, even if you have set upforwarding. If your mailbox is full, you will no longer receive any messages and they cannot beforwarded.
If you set up a forwarding to an external address, we cannot guarantee that the forwarded mail will actually reach you. The reason for this can be, for example, that the sender server has a policy that prevents forwarding via the TU Darmstadt server (SPF entries/checks).
E-Mail delivery
Background and further information can be found on our HRZ website on the subject of e-mail delivery.
Background and further information can be found on our HRZ website on the subject of e-mail delivery.
Each e-mail mailbox is allocated a certain amount of storage space. If your mailbox is full, there are various measures you can take.
- Delete e-mails: Delete superfluous e-mails and empty the “recycle bin” regularly. We recommend using the web interface for this. Here you can also set the number of days after which emails should be automatically deleted from the recycle bin on the server. A filter can be the right tool for organising e-mails and preparing them for quick deletion.
- Delete e-mail attachments: Files that are in the attachments and that you need should be downloaded and then deleted from your mailbox.
- Move to other mailboxes: Move e-mails to another mailbox. Note: This may only shift the problem.
- Move to “Local folders”: Move the e-mails to a local folder. These look like mailboxes in many e-mail programmes, but the e-mails are saved locally on the current computer. Please note: You must keep a data backup. It is not possible to access the e-mails in a local folder from another computer (such as a smartphone).
Prefix and Share can theoretically have the same name. Please note that only the following characters may be used: “A-Z”, “a-z”, “0-9”.
Note: The full name of the share is made up of the prefix (max. 5 characters) and the name of the share, connected by a hyphen.
Our recommendation: Use e.g. the abbreviation of your field of expertise as prefix. The prefix should be unique and is used for all your shares.
Customers of the file service can request an increase in storage space using this form.
Customers of the Workplace Support (APB) are supported by the APB, i.e. filestorage is part of the IT Workplace Management Services. Please contact the support if you need more storage space.
A guide to group administration in the IDM can be found here (opens in new tab).
A description of the systematics of the authorisation groups can be found in the service description. (opens in new tab)
- Open the file explorer (e.g. Win+E) and select “This PC” on the right side of the window. Now click on “Computer” at the top of the window and then click on “Connect network drive” in the bar that appears.
- Select a free drive letter in the line “Drive” in the new window.
- Enter the address of your network drive in the “Folder” line.
\\fsc-tu.hrz.tu-darmstadt.de\XXXXXXXX, whereby X is to be replaced by the name of the share (basic folder). - Leave the check mark for “Reconnect at login” checked.
In addition, check the box with “Establish connection with other login information” and click “Finish”. - In the now appearing entry mask enter ads\TU-ID (your TU-ID) as user ID and the corresponding password.
- Confirm the window with “OK”. The connection is now established and the network drive is visible in your file explorer.
Notes:
- t may happen that you get an error message when trying to connect to the new share. This indicates that you do not have sufficient permissions. But you' re sure or have checked that your service representative has given you the necessary permissions? Try to restart the computer, usually the share can be accessed afterwards.
- The drive can also be used at home when dialing in via an external provider. In this case, a VPN tunnel to the TU-Darmstadt network must be used. For further information please have a look at the service TU VPN.
This can have several reasons.
- You are using an outdated operating system. Upgrade your operating system to a current version supported by the manufacturer. These automatically support the required connection protocol SMB 2.x and higher (Linux users* may need to adjust the connection parameters).
- Are you outside the TU network? (WLAN at home, in a café, etc.). If so, you must first establish a connection via a TU-VPN before you can access your file service memory. For information on the TU-VPN, click here.
Employees of the TU Darmstadt can use their employee Athene card to borrow transponders in our HRZ service centres in a fully digital process.
It is explicitly desired that employees can borrow more than one transponder, so that they can give transponders to other people (students, external lecturers, etc.) on their own initiative. The employee whose Athene card was used to register the TU ID is and remains responsible for returning the transponder.
We have collected everything worth knowing under the top link “Access to the microphones”.
We lend the transponders for one semester only and ask you to return them to the HRZ-Service afterwards. The transponders are valid for one semester. It is not possible to renew the loan transponders online.
Staff members can have a personal transponder activated from the TU Darmstadt locking system for the microphones. To do so, please contact the corresponding office in Department IV.
If the batteries of your transponder weaken over time, you can have them replaced free of charge and at any time by the HRZ Service.
This depends on the lecture hall for which you are planning an event. We have compiled a detailed answer to this question under the link events.
Further information on the transmission between selected lecture halls can be found here.
The problem is easily circumvented. It is only necessary to buy a low-priced DVI/HDMI to VGA adapter with which it is possible to establish compatibility with the media technology used.
Usually, your laptop manufacturer offers a suitable adapter. If no manufacturer-specific models are available, we can recommend the following products:
- Logilink USB 2.0 to DVI/VGA/HDMI Multi-Display adapter
- Club3D SenseVision USB 2.0. to DVI/HDMI adapter
The interface to the media technology is the VGA socket on the connection panel in the hall. The operating model for media technology in the lecture halls is based on the “Bring-In-Multimedia” concept.
The demand on the installed media technology in a hall is: “robust” and “indestructible”. Although the installed technology is generally monitored permanently online, not all parts of the systems can be monitored in detail.
TU Darmstadt does not have staff to supervise the lecture halls, so there are no regular function checks on site! VGA cables are unfortunately wearing parts, they are broken after some time. VGA cables are also so mobile that they are often unintentionally packed by teachers and perhaps intentionally by others.
Since mmAG can never ensure that a functioning VGA cable is actually present in the room, it is more useful to bring this cable into the room with the mobile device. Even “tying” a VGA cable in the hall is not a satisfactory solution, because “tied” VGA cables will only break down faster.
Conclusion: It is a small additional effort for teachers to bring their own VGA cable, but this small additional effort ensures that teachers can use the robust technology in the TU Darmstadt lecture halls easily and reliably over the long term.
It is almost never possible to operate a Smartboard in conjunction with a MuFu variant, since a projection solution for a seminar room always tries to produce the largest possible image, positioned as high up on the projection surface as possible.
With an interactive whiteboard, however, the entire screen surface must be accessible by hand, even if the person operating the whiteboard is not 2m tall.
Interactive whiteboards are usually operated with a special projector with a very short focal length. The beamer is typically mounted on a boom of less than 1m length, directly above the smartboard. Ideally, the Smartboard, boom and thus also the beamer are height-adjustable as one unit (like a blackboard).
Interactive whiteboards only work in conjunction with a computer and laptop connected to the whiteboard. This is operated by the user. It would not make sense to use a centrally operated beamer control on a decentrally operated computer.
Therefore we do not offer interactive whiteboards.
The lecture halls of the TU Darmstadt cannot be serviced daily for logistical reasons. Therefore, it is unfortunately necessary that the lecturers themselves are responsible for the replacement of the foil rolls for lecture purposes. Usually the rolls of foil are deposited with the janitors and can also be received there.
Alternatively, it is also possible to obtain new rolls of film from the HRZ Service.
Please return the described and used film rolls to the janitors, the HRZ-Service offices or by internal mail to mmAG Stadtmitte.
Planning is still the HRZ's responsibility, whether it involves new appointments or conversions. You can contact us at the e-mail address netzbetrieb@hrz… to arrange an appointment on site. The costs of setting up the network are financed about half centrally and half decentrally.
At present, the switch is also financed centrally as part of the initial equipment. If the institute operates the network on its own, the switch is handed over to the institute and must be inventoried there.
Each institutes network has exactly one defined transfer point to the university network. This was defined as the end of the FO path at the institute distributor. The HRZ must therefore ensure the functionality at this point. The institute is responsible for the operation after this FO connection.
Via this interface the institute is provided with its IP subnetwork area.
The institute network can be operated as a service by the HRZ. Alternatively, the network can be operated by the institute on its own responsibility. In this case the interface is the FO cable to the building network.
Most importantly, there must be adequate cabling. Please contact netzbetrieb@hrz… directly in this case.
If an institute commissions the HRZ to operate the network, the HRZ takes over the maintenance and troubleshooting of the institute network up to the data socket in the institute. For this purpose, the active device (switch) is included in the network management of the HRZ and monitored for operational status and security.
This model also allows further configurations like different or distributed networks (VLANs). The institute is given read-only access to the port configuration and traffic accounting via a web account.
The software of the switches is kept up to date in consultation with the institute, and defective devices (switches) at the institute are replaced within one working day.
The HRZ ensures the operation of the network up to the data socket on the workstation computer. The costs for this are charged at 25 EURO/year per active switch connection and connected end device.
If an institution operates the network on its own, the HRZ must be given two contact persons who can be contacted in the event of operational disruptions or security breaches. These contact persons are the domain agents and can register, deregister and re-register computers in the assigned address area.
The transfer point is clearly defined in the self-operated network by means of a transfer point at a floor distributor specified by the customer. In any case, problems can be reported via the HRZ service by telephone, e-mail or via the web interface to a competent office at the HRZ.
After checking the interface defined for the institute, the client is informed. If the error is on the HRZ side, it will be corrected as soon as possible. If the error is in the institute's network, the HRZ can be commissioned as a service provider for troubleshooting within the scope of its personnel possibilities (however, there are no binding response times, as errors in the core network and with contract customers are given higher priority). In this case, billing is on an hourly basis. The hourly rate was set at 60 euros for internal university customers and 70 euros for external customers.
- First, a consultation is held, during which the exact procedure is clarified.
- A network service agreement is concluded, which comes into force at a previously determined start.
- The production of a uniform marking standard is carried out.
- Inclusion of the existing infrastructure in the cable management system.
- Furthermore, the network connections required by the customer are included.
- Installation and commissioning of the new switch infrastructure is carried out in parallel with the customer's existing infrastructure in order to minimize downtime during a changeover.
- Finally, the connections are switched over (with the least possible downtime).
- The changeover is completed by setting up web access to the port management system, which ensures an up-to-date overview of the switched connections.
No, services from the HRZ can also be used in the self-operated network. Examples are firewall, DHCP or NTP. In the opposite case, own, already existing services can also be integrated into a network service contract. For example: an institute's own firewall, existing servers or local private networks.
Please contact our mail distribution list netzbetrieb@hrz.tu-… or by telephone at 71112.
Problem:
This is often due to browser settings that block third-party cookies or scripts. However, these are required for OnlyOffice. If they are blocked, OnlyOffice cannot be loaded correctly as an external application.
Solution:
- Open Firefox and go to “Settings” > “Privacy & Security.”
- Select “Custom” under Browser Privacy and click the checkbox next to “Cookies”.
- Change the setting from “Block cookies from unvisited websites” to “Block cross-site tracking cookies.”
- Reload the next.Hessenbox webpage and try to open the document again.
Note: If the browser displays an empty folder page, delete the cookies and clear the browser cache. Then reload the page.
Currently, next.Hessenbox does not send separate email notifications for transfers of ownership.
The request is displayed in the web interface under 'Notifications' (bell icon in the top right corner). There, the recipient can manually accept or reject the request. The transfer of ownership takes a few minutes. Once the process is complete, you will receive a notification. This is the default behaviour of the system.
You can find current host lists here.
In a /30 and /29 subnet, all IP addresses can be assigned except the network, gateway and broadcast address.
From a /28 subnet and larger, all addresses can be assigned by the institute, except the network, gateway and broadcast address and an additional IP address below the gateway address.
The MAC address is a globally unique number of the network card and is assigned during manufacture. It is required by the HRZ for troubleshooting and in some areas for IP allocation (DHCP/BOOTP) and security. The address is usually represented as 6 two-digit hexadecimal numbers separated by dashes or colons, e.g. 00:00:C0:11:24:4a
If the MAC address is displayed as 44-45-53-54-00-00, this is not correct! (see below).
How do I find out the MAC adress?
On almost all current network cards there is a sticker with the MAC address, often with the addition “Node Address” or “Hardware Address”. The serial number may look similar, but usually has nothing to do with the MAC address.
How do I find out the MAC adress using Windows?
From the command line you can use ipconfig /all to output the network configuration. The MAC address is the physical address.
How do I find out the MAC adress using Linux?
With /sbin/ifconfig you get the interface data displayed. The MAC is the HWAddr for the interface eth0.
How do I find out the MAC adress using MAC OS?
In the apple menu you can access a screen via Apple System Profiler/Network Overview/AppleTalk. There you find the MAC address as hardware address.
For many services, such as SFP, DKIM or domain verification, it is necessary to enter a TXT record in the DNS.
Registration takes place as usual via the computer login.
Database: TXT
Status
Domain
Name
TTL
Data
TUID
Erzeugt
Modifiziert

Status: N
Domain: <Domain>
Name: <Name in der Domain oder @ falls der Eintrag für die Domain selbst ist>
TTL:
Data: <TXT-Daten>
TUID:
Erzeugt:
Modifiziert:
Example:
Database: TXT
Status
Domain
Name
TTL
Data
TUID
Erzeugt
Modifiziert

Status: N
Domain: starfleet.tu-darmstadt.de
Name: @
TTL:
Data: google-site-verification=xyz
TUID:
Erzeugt:
Modifiziert:
Your primary e-mail address stored in your TU-ID account is used as the identifier for the ShareLaTeX account. If this address changes, e.g. due to a change in your status or name, a new account will be created in ShareLaTeX instead of calling up your previous account.
In this case, please contact us by email: service@hrz.tu-…. We will link your previous account to your new email address.
Note: Please do not create any new projects until then.
There are errors in your project that ShareLaTeX that are not displayed directly. Instead, the compilation process times out after five minutes.
Solution: Follow these steps to have the exact error messages displayed:
1. Enable “Stop on first error” in the Compiler Menu
2. The project will now stop the compilation process at the first error and display it in the logs and output files. This way, you can gradually fix the issues in your project.
3. Select Compile mode “Fast [draft]”. This replaces all graphics with boxes, allowing the PDF file to be compiled much faster.
Source: Overleaf Help

External partners without a TU-ID who should collaborate on your projects can be invited using the “Link-sharing” feature.
You can find instructions here: https://sharelatex.tu-darmstadt.de/learn/how-to/Sharing_a_project
Note: When using “Link-sharing”, it is not possible to track the name in the comments, as people access anonymously via the link – similar to Google Docs or DropBox when sharing a link without a login.
The option “Inviting named collaborators” only works for people with a TU-ID. Please make sure to use the TU email address (…@tu-da…) when inviting them.
- Compile timeout
→ Default 180 seconds - Maximum number of files per project
→ 2000 - Maximum size of editable material per project
→ Default 7 MB - Maximum size of an individual editable text file
→ 2 MB
Note: Larger files may remain editable under certain circumstances. To ensure editability, limit the size to 2 MB or less. - Maximum size of an individual upload
→ 50 MB - Maximum size of project
→ Unlimited
Note: There is no fixed upper limit, but technical limitations may occur with very large projects. We recommend a maximum size of 500 MB, or less than 100 MB when using Git integration, for the best user experience. - Maximum Number of projects
→ Unlimited
Instructions on how to use SharePoint, information for key users and answers to frequently asked questions can be found on this page.
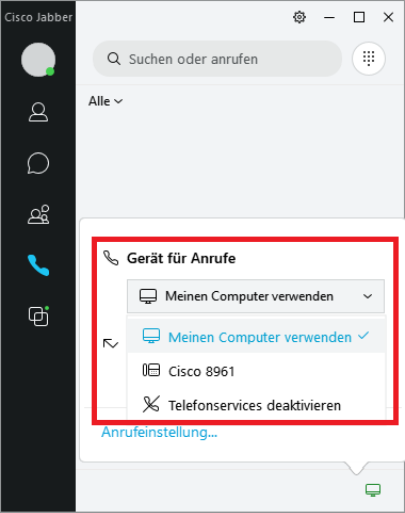
Jabber client
Jabber is set by default to make calls via a Cisco end device. If you want to make calls via your PC, you have to set it up once.
To do this, click on the icon in the right corner of the Jabber main window and select “Use my computer” (Meinen Computer verwenden) there. This setting will remain until you change it again.
You can find detailed instructions here (in German): Cisco Jabber – Telefonate am PC führen (opens in new tab)
Please use the Jabber client on another operating system (Windows/MacOS) or the mobile client (Android/IPhone).
Linux support is planned as part of the upcoming UC project.
Experienced users can also use the chat function with alternative clients. These must support XMPP and encryption. Please use TU-ID@hrz.tu-darmstadt.de and your password to log in. Due to the large number of clients, the HRZ is unfortunately unable to offer any further support.
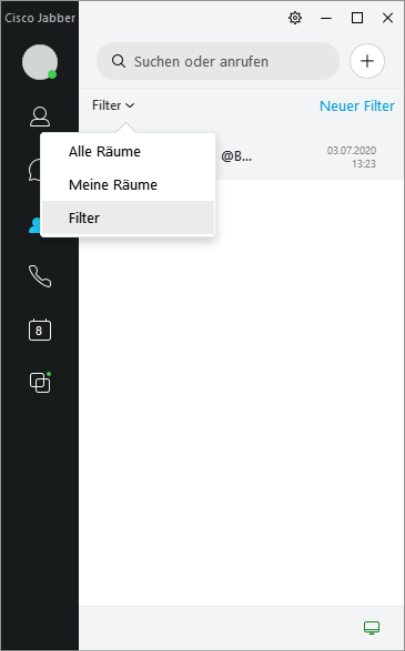
When a direct message (@name) is written to a member in a group chat, a standard filter is activated, which displays an unread message for the addressed user. The unread filter messages can be read using the drop-down menu of the group chats.
With 'New filter' you can create your own filters.
If you join a chat group, you will be informed about new information in the group by sound or visual pop-up messages. If these messages bother you, you can suppress them.
Follow the steps below:
- Click on the “Rooms” (=“Räume”) icon in Jabber, then double-click to open the chat group you want to mute.
- Click on the small “i” icon, to the left of the chat group name. A new window will open.
- Now click on the “Mute room” (=“Raum stummschalten”) button.
Note: Remember to unmute the setting if you want to receive notification of new messages again. Unmuting the room is done in the same way.
In despite to a traditional table based telephone (which is permanently connected to the telephone system) the software based Jabber-Client is only in ready state if the application is started and connected to the telephone system. In case of Laptop/Smartphone or what else is in state Power-save, Power-off, application not running oder no network connection established, the calling person gets the message “Telefon nicht registriert”.
What to do to avoid this?
Best choice: switch on your mailbox and setup a call forwarding for type “out of service”.
In case of an longer absence (e.g. holiday): do a call-forwarding to the internal call-number of your person at charge.
See our video tutorials for more information.
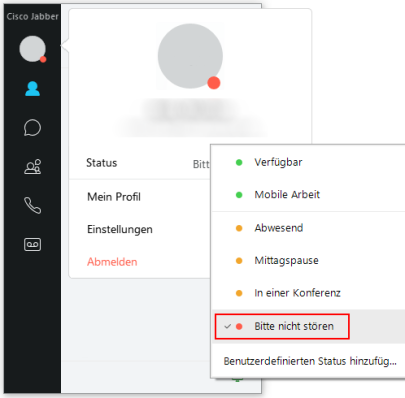
Setting the status information to “Do not disturb” ensures that the Jabber Client will not signal any more calls.
The ring tone is deactivated and there is no visual indication.
The call will appear in the call list when it is finished.
Please follow the steps below:
- Go to the “Settings” (Einstellungen) via the gear icon (top right of the application) and then go to “Audio”.
- Scroll all the way down and click on “Advanced” (Erweitert).
- Select the preferred audio device in the selection box and set the device to the top position using the arrow buttons below the box.
For phone calls out of the TU you have to pre-dial a leading 0, from cell phones only if you use the Jabber app.
To avoid problems you should generally use the international notation for the phone numbers in your contacts on the smartphone and the PC, so for German phone numbers: +49 <area code without 0> <phone number> (for example: +49 6151 1612345). This way all telephony applications behave correctly.
The registration of the Jabber client in the UC portal is tied to the specific end device with which the registration was performed.
This means that in the event of a device change (new cell phone, new laptop or similar), you must delete the registration of the old device's Jabber client in the UC portal and re-register the Jabber client of the new device.
UC portal: https://csm.net.hrz.tu-darmstadt.de/ciscouc/
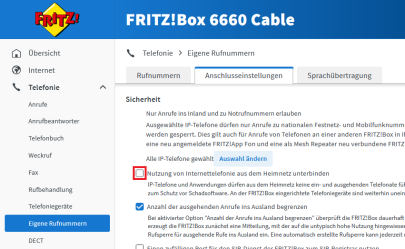
Many Internet providers use a FritzBox as a router for their network. Especially with rented boxes, the provider may activate various security mechanisms in the FritzBox settings. Among other things, IP telephony from the home network can be prevented. In this case, the Jabber client cannot connect to the TU Darmstadt telephone server.
To resolve the problem, log in to the user interface of your Fritzbox.In the settings, navigate to:
Telephony -> Own number -> Tab: “Connection settings” -> Security
The item “Prevent use of Internet telephony from the home network” must NOT be checked here.
General for Alcatel and Cisco
If your phone is showing a black display and this does not change after rebooting, please contact us.
If the handset cord or the handset of your desk telephone is defective, please send us an e-mail to netzbetrieb@hrz.tu-… with the request for replacement.
You will then receive the replacement delivered or installed. There are no costs for this service.
The following connection types are offered:
- Normal connection => digital system telephone depending on location and infrastructure
- Analogue connection => for fax or in exceptional cases DECT telephone
- Softphone Jabber => only available dedicated for the Cisco PBX
The selection of the telephone systems and terminals used is based on the location of the building. Unfortunately there is no possibility to choose the type of terminal and system.
Do you need a telephone or a new connection with a telephone number for your workplace? Then you are right with us.
You will find detailed information on this page.
A monthly basic fee is charged for a telephone. In addition, there are also call charges for telephone calls made. Details of these costs can be found in the billing section.
Internal calls are free of charge:
Telephone calls within the TU Darmstadt or within the system network (therefore also connected facilities in the same number range 06151 16 xxxxx)
External calls:
will be charged. You can find details of these costs in the billing section.
If you want / need to move your workplace, you will find the information and the corresponding form here.
Note: if a whole group or department is moving, these notifications are sent to us in a bundled form via a relocation coordinator.
If the name is changed, we can also apply this to the end device. Details can be found here.
Meaning of “Reserved telephone number”: It is possible to have one or more consecutive telephone numbers preregistered so that they can be used for setting up new terminals at a later date.
The reservation of a phone number costs 1,- Euro per month at the expense of the cost centre. This is due to the fact that for a reserved call number a licence with costs must be held in stock.
New starting from mid of 2023:
We do not provide reserved telephone numbers any longer. Already served customers are free to use their contingent but new purchasing or increasing their amount of numbers is no longer possible.
For international calls, call charges are sometimes much higher. Therefore, the cost center manager has to approve international activations. For further information see also here.
A special authorisation is required for call forwarding to external (also known as external call forwarding). Costs may also be incurred in connection with this call forwarding. Therefore we cannot change this feature to call forwarding. We need a change request signed by the cost center owner or local admin.
You can find the form here
For voice recording, both Alcatel and Cisco have an independent mailbox system. The voice mailboxes per terminal device are not available by default, but must be created by the Network Operation group according to your order.
After this initialization you can change the settings for yourself. Costs for mailbox provision and administration are included in the basic fee.
All details about voicemail can be found here:
Alcatel: Your mailbox can be accessed by pressing the key on the phone or by calling 1999.
Cisco: You can access your mailbox by pressing the key on the phone. This is located on the keypad, the key with the letter symbol.
If you forget your personal password for your mailbox, this must be reset by the HRZ technicians.
Please open a ticket for this purpose.
You can find the voicemail user guide here:
Telephone connections can be provided at many locations for conferences and other events. Interested parties should contact the HRZ via web form or directly via the ticket system or by e-mail (service@hrz.tu-…) to clarify whether connections can be provided at the venue. Call charges will be invoiced to the organisers.
You have the choice whether you want to display your phone number & name to the caller or not. If you wish, you can do this differently for each call.
The changeover takes place as follows:
select the key combination “*19” and then the phone number of your call partner. With this procedure you can switch the numerical display on and off.
Tip: on Alcatel terminals this function is also offered when starting to dial. To do this, press the button for “Geheim deak./akt.” on the right side of the display after lifting the handset. Depending on the activation or deactivation the abbreviation “deak.” or “akt.” is displayed.
It is also possible to assign a key permanently to the function.
Note: if the display suppression is active, no phone numbers/names are shown to the partner even during incoming calls.
Meaning: (Situation: second call is activated)
A call comes in during an ongoing call. The called party now receives a so-called “call waiting tone” signalled. Now the informed subscriber has the possibility to accept the second call. To do so, he or she must end the first call or put it on hold via consultation. The second connection is then established automatically.
What does this look like to a caller?
If “Call waiting is allowed” (second call = “ON”), the caller receives a ringing tone.
If “Call Waiting Not Allowed” (second call = “OFF”), the caller is signalled “Busy”.
Can I switch between the two variants?
Yes, this function is active by default (second call = “ON”) and can be deactivated individually.
- Alcatel participants:
during a call this can be changed by pressing a key (shown in the display). However, the change will only take effect from the next call. - Cisco participants:
the changeover takes place statically in the system. If you wish to change the second call “ON” <=> “OFF”, please contact us by ticket.
In addition to the simple “picking up the handset and starting to dial”, there are various options for recording dialing.
Details of the handling and effect are explained in this document: Block Dialling (opens in new tab)
MFV stands for multi-frequency dialling. Here, a specific tone is generated by pressing a number key, which is transmitted to the call partner for signalling (tone dialling).
Postdialling means that in an existing connection this tone dialling is used to control telephone conferences, information services, answering machines, etc.
Activate MFV postdialling:
- Alcatel: in the call state, the display shows “Send MFV”. To activate, simply press the key next to it. Alternatively the activation can be activated with the key sequence '*' and '0' as a feature.
- Cisco: in the call state, each use of the key is automatically transmitted to the other party as a MFV signal.
You can find further information on this pages:
For details, refer to
Alcatel equipment
Cisco equipment
The first point of contact in this case would be your IT administrator or the local cost centre manager you can contact. If he/she does not have any information about the telephones and telephone numbers, you can look them up in the TU Darmstadt telephone directory.
We provide an analogue TC connection or an IP port for the connection of an analogue or digital bell system. We do not offer any service regarding commissioning and maintenance of the system. This must be arranged by the operator of the doorbell system. If you are planning to use such a system, please contact us using the web form.
Especially for Alcatel terminals
If there is any noise, interruptions or chopped off words during a call or during call setup, the fault is probably due to a defective handset or handset cord.
In such a case, please contact us via fault message or ticket. See the contact bar on the right.
There is the classic 3-person conference and another variant allows for a maximum of a 29-person conference.
Details on conferences are described in the operating instructions for the respective terminal. This link will take you there.
Note: the inviting caller bears the costs.
In general, no UC functionalities can be used for Alcatel terminals. However, the Jabber Client could be installed and used on the computer. If you have any questions about this you should contact us by ticket.
Especially for Cisco devices and applications
This could indicate a temporary weakness in the network, but possibly also a defect in the end device (e.g. receiver cord).
You can report this to us as a fault and we will take care of the troubleshooting. Please use the link to the web form provided in the contact column on the right.
The procedure is as follows:
You start with an existing call.
Press the Conference key and perform the following steps:
- Enter the phone number of the participant(s) you want to add and press the Call softkey.
- Wait for the party to answer the call (or continue to the next step in the meantime).
- Press the Conference key or the Conference softkey. The conference starts.
Repeat these steps if you want to add more participants to the conference.
Note:
– If a participant (including the conference starter) switches off, the other participants remain in the conference call.
– The inviting caller bears the costs.
Error messages
You should withdraw your agreement to the DFN-AAI in the IDM portal once and renew it again. You can give your consent to the transfer of data to DFN in the identity management of the TU Darmstadt in your personal account under the menu item Zustimmungen" (in the left menu): https://www.idm.tu-darmstadt.de/idmPortal.
TU-GitLab requires the consent of the data transfer in DFN-AAI. Authentication is carried out via the Shibboleth service of DFN (German Research Network). You can give your consent to the transfer of data to DFN in the Identity Management of TU Darmstadt in your personal account under the menu item “Zustimmungen” (in the left menu): https://www.idm.tu-darmstadt.de/idmPortal.
Accounts that are not used for a longer period of time are automatically blocked and must be reactivated. Please contact us via our support form. If a project has not been used for 12 months, the user will be asked by e-mail whether the project is still needed. If there is no response within 8 weeks, the project will be deleted.
Gerneral
- Employees – Everyone who has a contract of employment with TU Darmstadt and is registered in the SAP via Directorate [Dezernat] VII.
- Students – All students who are registered regularly at TU Darmstadt and have a matriculation number.
- Guest Students – Those who wish to participate in courses of TU Darmstadt without the usual requirements or a university entrance eligibility. More information.
Furthermore there are possibilities for groups of people with a legitimate interest in a TU-ID, who are not part of the groups mentioned above, to apply for a TU-ID for guests [Gast TU-ID] via the Staff of TU Darmstadt. For further information please view below under “Who is eligible to a TU-ID for guests?”.
With the TU-ID you can log in to many IT-Systems at TU Darmstadt. This way you only need a user ID (TU-ID) and the corresponding password. Furthermore you need a TU-ID to receive a Athena card.
You can find more information about TU-ID in our service catalogue.
If you do not regularly receive a TU-ID but have a legitimate interest in a TU-ID, you can apply for one via the application form of the HRZ-Service. The application may only be filed by a natural person, who is employed by TU Darmstadt. This person is then the contact person and is responsible for the TU-ID for guests.
Examples for groups of people with a legitimate interest:
- External doctoral candidates who do research at the departments of TU Darmstadt
- Student assistants of other universities, who work for a facility of TU Darmstadt
- Research partners, visiting professors, emeriti
- Members of Vereinigung von Freunden der Technischen Universität zu Darmstadt
Your TU-ID is public. You keep the password secret!
Emergency contact
The emergency contact is a personal email address other than the address received from TU Darmstadt. Alternatively you can use your mobile number. The emergency contact is used exclusively for recovering the password.
The emergency contact can be set in the IDM-Portal (user portal of the identity management), in the section “Notfallkontakt”: www.idm.tu-darmstadt.de/idmPortal
If you have forgotten your password and haven't set any emergency contact yet, the HRZ-Service counter staff can help you to specify an emergency contact on site. Please bring a photo ID.
Since this service can only be provided by the staff and not by the student assistants, please come in the core hours of the service desk (usually 8-16 o'clock), or check the HRZ-Hotline for available staff.
Access to the TU-ID, Forgotten Password
If you have set an emergency contact in your TU-ID account (a private mail address or mobile number), you can set a new password on this page: https://www.idm.tu-darmstadt.de/passwordRecovery. Please follow the instructions given there. For further questions please contact the HRZ service.
If you should forget your password without having set an emergency contact, the staff at the HRZ service counters can help you set an emergency contact on site.
Please bring along photo identification.
Since this service can only be provided by the staff and not by student assistants, please come during the core times of the service counters (usually 8-16 o'clock), or check the HRZ-Hotline if any staff is present.
The opening hours can be found on our homepage under www.hrz.tu-darmstadt.de/service
Passwords not changed since 02/14 do not comply with our new password policy.
The following actions are recommended: Check in the IDM portal under “Emergency contact” whether you have stored an emergency contact in your account in the form of a private e-mail address or a mobile phone number.
If a valid emergency contact is available, please use the password reset function to set a new password. The password recovery function can be found here:
https://www.idm.tu-darmstadt.de/idmPortal/
This procedure is only required once. Afterwards you can set your password in the usual way over “Passwort setzen” in the user portal.
Everyone who has set a password after March 2014 can ignore this, as your password is compliant with the newest password policies.
You receive an activation code, with which you can start the activation process under this link: http://www.idm.tu-darmstadt.de/activation. Furthermore the following personal information will be asked of you:
- Students – You require the activation code, your matriculation number and your date of birth
- Guest students – You require the activation code, your guest student number and your date of birth.
- Employees – Your require the activation code, your staff registration code and your date of birth.
- Guests (TU-ID for guests) – Your require the activation code, the activation number and your date of birth.
The activation code is sent to you via post, as soon as the TU-ID is registered in the system. This may happen through different ways:
- Students in the first semester – You receive your activation code with your matriculation letter [Immatrikulationsschreiben] or your study data sheet [Studiendatenbogen].
- Guest students – you recieve your activation code in the confirmation letter upon your application for guest students.
- New employees – You receive a personal letter with the activation code to your organisational unit via internal post. Please ask at your new place of employment about mail for you as soon as possible.
- Guests (TU-ID for guests) – The letter with the activation code is sent to the person who has applied for the TU-ID for guests for you via internal mail.
If your activation code is no longer accessible and the TU-ID is still inactive, you can receive help from the HRZ service.
You will receive help on site, if you come to our service counters with a photo identification. As soon as you have identified yourself, our staff will help you with the activation process.
For employees we can alternatively send the activation code to the organisation unit set in the system via internal mail.
- Studierende – Three months after the de-registration.
- Employees – Four weeks after the end of the contract.
- Guests (TU-ID for guests) – Up to the expiration date stated in the application.
No, this is not intended. You are assigned a TU-ID in the format xx12abab.
If you enter the wrong password several times in a row, your TU-ID will be blocked for several minutes. This way we can stop third parties from abusing your account by trial and error. If you are sure you still know your password, please wait a few minutes and try again. Should you not know your password anymore please reset it via your emergency contact. (see above: “I have forgotten my password. How can I reset it?”).
We recommend to set a secure password which you can easily remember. You can find further tips here.
This can happen if you have a password shorter than nine characters. Set a new password via the emergency contact that is compliant with the password policies or, in case of no valid emergency contact, seek out the HRZ service counter.
In case this does not help, please write the HRZ service a ticket with your TU-ID in it.
This problem occurs in case the “Connectivity Checking” option is activated under “Settings -> Privacy -> Connectivity”. Deactivating this option solves the problem.
The tests were done by using Ubuntu 22.04.4 and the Cisco Secure Client 5.1.2.42.
An alternative client is OpenConnect (http://www.infradead.org/openconnect). According packages are offered for conventional Linux distributions. Ports for Windows and MacOS X are also available. Linux allows you to enable a connection with “sudo openconnect https://vpn.hrz.tu-darmstadt.de”. You can also use NetworkManager's GUI.
Unfortunately, we are not able to provide support for this software.
However, the HRZ's user support service provides assistance during installation. At their location you will find a computer that is equipped with several virtual distributions for demonstration purposes.
Passwords should only consist of letters from ( a-z , A-Z ), numbers and the following special characters:“ $ % & ‘ ( ) * + , – . / : ; < = > ? @ [ \ ] _ { }. Passwords should not contain an umlaut: ( ä ö ü Ä Ö Ü ). The reason for this is that several operating systems are not able to process these correctly. In this case passwords are recognized as incorrect.
- Terminated installation
- Error message: “VPN client agent was unable to create the interprocess communication depot”
- Reason: It is possible that settings regarding the joint usage of Internet connections are causing problems concerning the network interfaces.
- Solution: deactivate this feature.
- 1. “Start --> control panel --> network and Internet --> network and sharing center”
- 2. “Change adapter settings”
- 3. Select an adapter by right clicking it.
- 4. Make sure to remove the setting that allows other users to use this computer connection for Internet access in terms Internet connection sharing.
- 5. Confirm these changes and click “OK”.
- 6. Complete this entire process for all further adapters you are using.
SMTP port (Port 25) is blocked for TU Darmstadt's entire network since the 25th of September, 2007. This entails that emails can no longer be sent beyond TU's network directly. Mail gateways need to be used instead.
You can log in via WiFi by using TUDWeb. However,eduroam is not going to work in this situation. Please set up a new password and pay attention to upper and lower case letters.
This message means that Cisco AnyConnect VPN service is currently not running. This could be caused by Windows boot accelerator software. These modifications might influence the rebooting process of Windows services in a ways that are no longer supported.
For example, such problems were caused by Lenovo Rapid Boot. Please uninstall this kind of software to solve the problem at hand.
AnyConnect Client verifies the certificates of remote stations. If you are only receiving a notification regarding this error while being at certain locations (e.g. hotels, hotspots etc.), then network access is terminating your SSL connection. This situation does not provide secure transmission, which is why you should proceed by using a different source for Internet access.
In case you are receiving notifications concerning this error regardless of what kind of Internet access you are using, please make sure that Telekom's certificates are installed on your device. Also, check whether you entered “vpn.hrz.tu-darmstadt.de” correctly.
If you are still experiencing problems after trying to problem solve as explained in the preceding steps, please use AnyConnect Secure Mobility Client's tool for troubleshooting.
In order to generate the document that needs to be send for system diagnosis, please do as follows.
1. Open Cisco AnyConnect Secure Mobility Client.
2. "Start -> all programmes -> Cisco -> Cisco AnyConnect Secure Mobility Client -> Cisco AnyConnect Diagnostics and Reporting Tool
3. Do not change any of the default setting and proceed
4. In order to generate and send the document, you need to chose the email package or send the document by using your preferred email programme. You may also use the inbox: netzbetrieb@hrz.tu-darmstadt.de.
Since 2015's February Patchday it is possible that a connection may cause an error message that notifies you of a failed connection system or subsystem initialisation.
This problem can be avoided by activating a compatibility mode for the programme “vpnui.exe”. The according method is described here. Microsoft and Cisco are working on fixing this problem.
Meanwhile Microsoft has issued a FixIt for KB3023607.
Before upgrading you should be sure to switch to AnyConnects current version. Connect to VPN gateway and execute the according update.
If there are any further problems after this update, please uninstall AnyConnect Client completely.
All questions and answers about the service can be found in this FAQ(German only).
Installation settings / extensions
The V-Server is provided including network, firewall configuration and other relevant system settings and is in a current patch state.
Windows:
- A new V-Server is cloned from a template for each operating system version. During this process, the server name is automatically adopted and a new SID for the server is generated using the Microsoft tool sysprep.
Linux:
- A V-Server is created fully automatically with the help of a so-called “unattended installation”.
Windows:
- The installation is carried out in a single partition C: ; additionally, there is a partition reserved for the system.
- The server license is activated automatically via the KMS server of HRZ.
- The basic installation of the server is in English language.
- The IPv6 network stack is completely deactivated via a registry entry.
- There are no tools for display changes like classic Shell installed.
- Additional software will not be installed.
- Root V-servers will not be added to the domain of the HRZ.
- The server name is determined by the group System Operation according to a naming scheme.
Linux:
- The software equipment corresponds to a minimum installation of the respective distribution.
- The basic installation of the server is in English.
- /boot lies in a separate partition. The root file system and the swap area are located in an LVM.
- The IPv6 network stack is completely disabled by a boot parameter.
- The classic naming scheme of the network cards (“eth0”) is kept despite system. This is implemented with the help of an appropriate boot parameter.
- As soon as the hardware extension is completed in the virtualization environment, it can be used directly in the operating system.
- CPU, RAM and hard disk expansion can be carried out in consultation with the customer. System times and effects depend on the respective server configuration.
Network and Firewall
The subnet/IP address for the server is specified by the HRZ or must be available in the central server room.
- The local firewall is active by default and blocks all ports not explicitly released.
- Remote access is restricted to the TU network and is
- for Windows via RDP
- and for Linux via SSH.
- The regulations of the Bordergateway Firewall of the TU Darmstadt are also valid for this server.
- The customer is responsible for the local firewall rules after handing over the server.
- The System Operation group registers the server with a predefined name (FQDN) in the central network management. The customer can register additional alias entries in his own domains.
- The registration is done with the option of activated Internet access.
- The server can be configured in a dual stack mode. In this case it receives an IPv4 address and an IPv6 address in parallel.
- The operation of IPv6 is done according to the network specifications.
- For the IPv6 address, the procedure is the same as for IPv4 login.
Access to the server / monitoring
Windows:
The Microsoft Server can be reached via the Remote Desktop Service. A suitable client exists for all common operating systems. The Windows operating system comes with the tool mstsc pre-installed.
Linux:
Remote access to Linux servers is via SSH. For Windows users, the software package “Putty” exists which provides this functionality.
Windows:
- A purely administrative exchange can be realized via a compatible RDP client. The data is inserted by copy and paste and “looped through” via the local network connection.
- The protocols SMB or CIFS can be used for data exchange.
Linux:
- The protocols SMB or CIFS can be used for data exchange.
In case of problems or questions you can open a support ticket at any time. The server will then be restarted as soon as possible.
Windows:
The administrative Remote Desktop is limited to two simultaneous RDP connections. This is the free standard from Microsoft. If you want to establish more than two simultaneous connections to the server, the server must be operated as a terminal server. This requires additional paid licenses from Microsoft.
Linux:
You can open almost any number of SSH sessions simultaneously.
User accounts and management
Windows:
Linux:
Update and system times
Windows:
- When the server is delivered, it is in a current state. All patches available via Windows Update have been installed.
- An exception to this is the Malicious Software Removal Tool. This is not updated.
- The settings for Windows Update are preconfigured as follows:
- Install updates automatically
- no “recommended updates”
- Give me updates for other Microsoft products when I update Windows
Linux:
- When the server is delivered, it is in a current state. All available patches have been installed.
- Automatic updates are activated. If necessary, the system will be rebooted automatically.
Service agreement
The term is 12 months and is automatically extended by 12 months thereafter.
No, the agreement is automatically extended for another 12 months.
To the next 1st of a month, after the provision.
The invoice is debited internally via the cost centers.
- The debit begins with the term of the agreement, annually in advance.
- The HRZ reserves the right to change the debit run to quarterly or monthly billing.
The agreement can be concluded with a notice period of three months to the end of the term.
The settlement is adjusted on the next 1st of each month and settled or invoiced in the next debit run.
As the responsible person, you can informally terminate the agreement at the next possible date. To do so, use the contact form on the V-Server web pages.
Other questions
Sophos Endpoint Protection is not pre-installed on your V-Server. Please note the guidelines from Information Security at TU Darmstadt. Please install and activate the Sophos Endpoint Client yourself on your V-Server.
You can find more information on the web pages of Information Security (opens in new tab) at TU Darmstadt.
Additional software can be installed independently. The customer is responsible for any required licenses and for safe operation.
- The Windows Server version is licensed through the System Operation group.
- A Microsoft Server access license is included for all employees of the TU Darmstadt. (Client Access License, CAL)
- All other licenses must be kept available by the customer. This includes the licenses for Office, SQL, TerminalService, ExchangeCAL, SharepointCAL etc.
- Some software products require special licensing on virtual environment. If you need more detailed information, we will provide it on request.
The HRZ's central information channels – newsletter and website – also provide information on news and disruptions.
In case of problems or questions you can open a support ticket at any time.
We have already created your V-Server in the Central Information Security OS (opens in new tab) (cisOS) platform with basic information and automatically assigned it to your organisational structure.
As the responsible operator, we ask you to add further system and role information and to keep it up to date at all times.
Further information can be found on the cisOS – Information Security (opens in new tab) website of the Technical University of Darmstadt.
Zoom & Privacy Policy
Zoom – Privacy Policy, Information on data protection: Privacy policy (opens in new tab)
Information of the data protection team of TU Darmstadt from 05/05/2020 about the Using Zoom at Technical University of Darmstadt (EN) (opens in new tab).
The Heise ticker and other media have recently reported on older security flaws and outdated default configurations of the zoom system.
The collection of anonymous data usage from a Facebook service, which is still in the iOS app, will disappear with an update of the iOS app.
https://www.heise.de/mac-and-i/meldung/Zoom-beendet-Datenweitergabe-der-iOS-App-an-Facebook-4692815.html
Reports on configuration options that were generated by default meetings without a password are long outdated. Today, meeting IDs are not so easy to guess, and meetings are created by default with a password.
https://www.zdnet.com/article/zoom-fixes-security-flaw-that-could-have-let-hackers-join-video-conference-calls/
An assessment by a specialist lawyer for IT law, says: “For me, ”Zoom“ is currently the best mix of quality, scope of services, price and also data protection friendliness. This may sound strange for a US provider. But for me it is.”
Read the full article here: https://www.datenschutz-guru.de/datenschutzhinweise-zoom/
Zoom configuration at TU Darmstadt
- To participate in a meeting via telephone, you need a password by default.
- Authentication via Google and Facebook is disabled.
- The integration of other calendars into the zoom desktop client has currently been switched off because it does not make sense to store passwords or rights to connect to the groupware service of the HRZ in the Zoom.
- The integration of Zoom into Outlook is done by an add-in/plug-in that works in connection with the local Zoom client. Registration to the Zoom system is done exclusively via Zoom client.
Important: The Outlook plug-in enters the link to the meeting generated by Zoom-System into the “Location” field in the appointment. If you have made the field “Location” visible to other people in your groupware calendar, these people also have access to this link and could participate in the meeting via this link.
Further recommendations to avoid the unwanted use of tracking services (Google Analytics etc.) on the zoom websites:
- Please use the Zoom desktop application and not the Zoom website to start or join meetings.
- Please do not invite to Zoom meetings via the invitation link generated by Zoom. Instead, please tell the participants the meeting ID and the meeting password. In the desktop application you can enter the ID and password to start or join a meeting.
It is strongly recommended that you always set a password for your meetings so that no unauthorized persons can access your meetings.
Make absolutely sure that the assignment of a password is enabled by checking the box under “Password > Meeting password is required”.
Never put your password in the subject or location of your meeting invitation and keep it, like any other password, completely confidential.
Recommendations for using Zoom
The following points/considerations are helpful for a smooth running of your meetings with Zoom:
- If required, short communication/explanation of communication procedures/function (Raise-Hand, Chat, Polling)
- Mute the participants when entering the meeting
- Using Waiting Rooms
- Division of meetings into several separate sessions – Breakout rooms
(The campus license allows a meeting to be split into up to 100 breakout rooms) - Record meetings only after approval of all participants!
The e-learning working group of the TU Darmstadt also provides detailed information and recommendations for the use of Zoom in teaching. The functionalities are described, for which scenarios they are usefully applicable and which corresponding settings should be made in Zoom.
Additional information
Zoom offers the following possibilities to delegate accounts and meetings:
Co-Host
Especially for larger meetings, it can be useful to have a Co-Host to support the meeting. For example, the Co-Host's task is to manage the list of speakers, the participants' microphones, etc. Co-Hosts can also push participants into a waiting room and bring them back. However, some functions can only be used and controlled by the host.
https://support.zoom.us/hc/en-us/articles/201362603-Host-and-Co-Host-Controls-in-a-Meeting
Pass Host
If a host has to leave a meeting, he can transfer his host role to another meeting participant. This can also be a participant with a free Basic license.
https://support.zoom.us/hc/en-us/articles/201362573-Pass-Host-Controls-and-Leave-the-Meeting
Alternative host
If a host is unable to host/start a meeting because he is prevented from doing so, he can transfer his meeting in advance to another person who will assume the host role for him.
It can be assumed that the other person will also need a paid license, as a free basic license is probably not sufficient.
https://support.zoom.us/hc/en-us/articles/208220166-Alternative-Host
Scheduling privilege
If the need for regular representation of another person is foreseeable, the respective persons can grant each other certain rights, such as creating and hosting a meeting. This automatically includes the “Alternative Host” function.
All persons representing themselves require a paid license for this.
A letter and data sheet from Zoom executives (23/04/2020):
- Statement from Zoom about the current bugs (01/04/2020):
https://blog.zoom.us/wordpress/2020/04/01/a-message-to-our-users/ - Zoom complies with the GDPR aka DSGVO:
https://support.zoom.us/hc/en-us/articles/360000126326-Official-Statement-EU-GDPR-Compliance - The current use of the data is briefly described there:
https://zoom.us/privacy - Information on the procedure for processing order data can be found in this article:
https://www.datenschutz-guru.de/so-schliesst-du-einen-auftragsverarbeitungsvertrag-mit-zoom/ - Assessment by RWTH Aachen University:
https://video.cls.rwth-aachen.de/zoom-sicherheit-und-datenschutz/
The transmission of screens and controls is done with the encryption of Zoom. According to all that is currently known, the connections from client to client are made via their server (except 1:1 sessions). The usual Transport Layer Security (TLS encryption) is used for secure data transmission.
Information about the default screen sharing settings:
https://support.zoom.us/hc/en-us/articles/360041591671-March-2020-Update-to-sharing-settings-for-Education-accounts
General Questions
Two-factor authentication (2FA) is available for all TU-IDs and TU-TechIDs. You can register via the 2FA administration portal and secure your account right away.
Even TU-IDs in the follow-up period are supported.
Instructions for setting up 2FA can be found on the website Setting up two-factor authentication.
Yes, you can also secure your TU-TechID with a second factor.
Please note that a token can only be assigned to one account.
- In addition to an active TU-ID, you will need a device that generates one-time passwords. This can either be a dedicated device (hardware token) or software installed on a PC, smartphone, or similar device (software token). A software token can be used on both work and personal devices. Such software is available for all major operating systems — for example, the Privacy Identity Authenticator for Android and iOS, or KeePassXC for Windows.
- Instructions for setting up 2FA can be found on the website Setting up two-factor authentication.
- To log in to the SSO, you need an Internet connection.
Once activated, the second factor will be required for every login to the login server. This significantly increases the security of your account and makes it much harder for attackers to gain access. It also helps you become familiar with using the second factor in everyday use.
With normal usage, you will typically log in around once or twice per day.
You can enable basic protection for your TU-ID at any time by registering a second factor yourself.
Instructions for setting up 2FA can be found on the website Setting up two-factor authentication.
There is no general answer to this question, as it depends on your personal skills and circumstances. If you already use a password manager and have a mobile phone with an authenticator app installed, setup will take approximately 5–10 minutes. If this is not the case, you should allow approximately 30 minutes for setup.
Yes, it is recommended to activate two independent 2FA tokens. The best combination is an app on your mobile phone and a token stored in your password manager. A hardware token is not usually necessary, but can serve as an alternative to a mobile phone if no work mobile phone is available or you do not want to use your private mobile phone.
No, but a private smartphone may be used (which suits many users for reasons of convenience). Those who do not want to do so and do not have a work phone can obtain a hardware token. Procurement is carried out as for all work equipment.
If you have another token, you can independently generate new recovery codes in the 2FA administration.
However, if you no longer have access to a token, 2FA must be deactivated for your account.
You can find information about deactivation in the section “How do I deactivate 2FA for my account?”.
If 2FA has been activated for an account, it cannot currently be deactivated by users.
If you wish to completely deactivate 2FA on your account, please contact us.
As part of the deactivation process, we will verify your identity using an ID document to ensure the security of your account.
Under certain circumstances, you may then no longer be able to log in to the services of TU Darmstadt. For this reason, it is always recommended that you set up at least one additional independent factor. It is also possible to register as many tokens as you wish.
Token
A token is a security component and offers the technical possibility of proving your own identity (TU-ID) with a second factor.
A token is available in both software and hardware versions.
You can assign multiple tokens to your account.
For security reasons, services offered at TU Darmstadt may require users to authenticate with a specific type of token. This approach is similar to what is already common in online banking, where specific tokens are required for access.
Depending on the security level, tokens are classified into different levels. A token is always valid for the lower levels as well.
Connected applications may require tokens of a specific level.
- Level 1 “basic”: Self-registered software tokens
The TOTP method is currently supported. - Level 2 “medium”: Self-registered hardware tokens The WebAuthn method is currently supported.
- Level 3 “high”: A hardware token assigned by the HRZ after identification of the person. Currently, the TOTP, HTOP and WebAuthn methods are supported.
This depends on the security requirements of the respective services and the data they handle, and is determined by the individual service providers.
The token levels are a preparatory measure for future developments. At present, there is no requirement to use a higher token level for general services.
- TOTP – Time-based one-time password
A regularly changing sequence of numbers based on a secret shared between the server and the client. Users can register this themselves via the 2FA administration. - HOTP – HMAC-based one-time password
Similar to TOTP, but based on a counter rather than the current time. This makes it easier to implement in hardware devices. - WebAuthn
A modern method for implementing second factors, supported natively by many operating systems. It often allows the use of built-in biometric features, such as fingerprint or facial recognition. Hardware implementations are also available. However, this protocol is optimised for web authentication and is only partially compatible with login methods such as RADIUS or LDAP, commonly used for server access. - TAN
As a backup access method for the 2FA administration, a TAN token is created when you first register. These one-time codes are only valid for logging into the 2FA administration and serve as a fallback in case your other tokens are lost.
Currently, the HRZ does not issue hardware tokens. However, the HRZ has tested several hardware tokens, and you can find our experiences in the following FAQ entry.
If you wish to secure your account with a hardware token, you will need to obtain one independently. You can link these hardware tokens to your account through the 2FA administration portal.
For certain high-security applications, it may be necessary for the HRZ to confirm the assignment of a token to your account. In such cases, please contact us.
Choosing the right hardware token largely depends on your specific requirements. We have tested several tokens available on the market and would like to share our experiences here.
I only use 2FA for TU Darmstadt services, mainly for SSO
This scenario primarily applies to administrative staff, for example, who only need to use their second factor occasionally. As such, manual entry of the second factor is acceptable.
In this case, we recommend a TOTP token with a display. This type of token requires no hardware modification and can also be used on the go.
We have tested the following models successfully:
- Token2 C302-i (from approx. 22€)
- Feitian i34 C200 TOTP (from approx. 13€)
Please note: You cannot set up this token yourself; you will need assistance from the HRZ. Further information on the procedure will be available here shortly.
I also use 2FA with external services (e.g. github) or more frequently
This scenario primarily applies to administrators or developers, for example.
External services are increasingly adopting WebAuthn/Passkeys, so a token with this feature is recommended in such cases. The disadvantage is that these tokens need to be connected to the end device. Therefore, you must choose a token compatible with your device (USB-A, USB-C, NFC). Additionally, your working environment may need to be adjusted (for instance, a USB extension and/or a lanyard/keyring may be helpful in some situations).
However, WebAuthn is not supported by all services (e.g. VPN), meaning the token must also support TOTP or HOTP.
We have tested the following models successfully. Both are also available in a USB-C version, among other options:
- Token2 PIN+ Release2 series (from approx. €23)
- YubiKey 5 series (from approx. €60)
I already have a token, or none of the above recommendations suit my needs.
In principle, all tokens that support WebAuthn and either TOTP or HOTP are compatible with our implementation. We do not recommend pure WebAuthn tokens, as it would not be possible to log in to services connected via LDAP, for instance. We have gained experience with models beyond those mentioned. Please feel free to contact us.
If you have chosen a hardware token, you can register it in the system yourself.
To do this, you will need a supported hardware token, which we assume supports both WebAuthn and HOTP, in line with our recommendation.
You will also need a manufacturer-specific application to configure the HOTP functionality, such as the Yubico Authenticator or the TOKEN2 T2F2 Companion app. Please consult the manufacturer of your hardware token for instructions on how to configure it.
- First, activate 2FA on your account according to the instructions above.
- After that, it is recommended to roll out the hardware token with WebAuthn.
- If you are using this token on a website for the first time, you will also need to set a PIN. This is required, for instance, when registering on certain websites.
- Next, roll out a HOTP token. After entering the description, you will receive a private key.
- Using the manufacturer-specific application, you can configure your hardware token with this private key.
- If successful, you must confirm the configuration by entering the OTP. This is typically done by touching the hardware token. Depending on the configuration, you may also need to touch the token for a longer period (approximately 5 seconds).
You can influence the preselection by adjusting the description of a token in the 2FA management. For example, add ‘000 ’ to the beginning of the description of the desired token so that it appears at the top of the list and is selected as the default.
A wide range of common methods is supported. Users can choose the method that best suits their preferences and may also combine multiple methods as they wish.
In the future, Passkeys will also be supported, but there is no concrete roadmap for this yet.
Services
Currently, the second factor is requested after registration for all login processes at TU Darmstadt Single Sign-On (SSO).
This automatically protects all services connected to the SSO, e.g. Gitlab, the IDM portal or SAP Fiori.
For some applications (Jabber, VPN, Radius), authentication is only possible with TOTP or HOTP. If only other tokens are available, the login fails.
Services that are connected to the Active Directory (e.g. computer login and Exchange/Outlook) do not currently check the second factor. The same applies to Microsoft 365.
TUCaN is not yet connected to the central SSO procedure. The original plan was to connect TUCaN to the SSO of TU Darmstadt as part of an update to the web portal in November 2025. Due to a delay, the connection is not expected to take place until February 2026. Once connected, you will be able to use the second factor set up in the IDM portal to log in to TUCaN as well.
Yes. The central VPN access (Cisco AnyConnect) will also be secured with two-factor authentication (2FA). No further action is required from users. The 2FA protection will be activated in the new year. The 2FA tokens already registered for your TU-ID will then automatically apply to the VPN access as well.
We are currently evaluating possible implementation options. The IMAP protocol does not technically support two-factor authentication (2FA).
It is likely that a solution based on device-specific passwords will be introduced, similar to the approach used by many commercial email providers. Further information will be provided once the implementation plan has been finalised.
If your service is connected via SSO, it already benefits from the 2FA implementation. All users who have activated 2FA will be prompted for the second factor each time they log in.
It is also possible to restrict access to your service to users with a second factor. You can also specify, for example, whether all types of tokens are permitted or only hardware-based tokens. This configuration is best carried out in close consultation with us. Please feel free to contact us.
Further questions
If a HOTP or TOTP token no longer works, even though it previously functioned without issue, one possible reason is that the shared information between the server and token is no longer in sync.
In addition to the private key, the server and token must align on the current status. For TOTP tokens, this is the current time, while for HOTP tokens, it is the number of uses.
Although there is some leeway, if the clock on the TOTP token is faulty or the HOTP token has been activated too frequently between authentications, it’s possible that these states no longer match sufficiently.
To resolve this, you will need to resynchronise the token. Please follow these steps:
- Log in to the 2FA administration. If necessary, use one of your recovery codes.
- Select the faulty token.
- Enter two consecutive OTP values in the fields next to the “Resynchronise token” button. For TOTP tokens, you may need to wait a few seconds until the next value is displayed.
- Click “Resynchronise token.”
- If the process is successful, you will see the message “Token was successfully resynchronised.” Your token should now work again.
It’s possible to lose your token. A hardware token could be lost or damaged, for instance, while a software token may be lost if the device is lost or the operating system is reset.
In such cases, you can log in to the 2FA administration using the recovery code you created during registration and remove the old token.
You can also register a new token from there.
No, SSH may continue to be used without 2FA in the future. The public key cryptography used here already ensures that two factors are used for security.
Public systems that do not require authentication also do not require 2FA. If the app tokens are only there for rate limiting, this is unnecessary.
M2M communication is not affected by 2FA. 2FA serves to secure user accounts.
The Nitro Key is currently incompatible and therefore not recommended.
No, that does not meet the definition of two-factor authentication (2FA). The second factor must be uniquely linked to an individual and cannot be only temporarily assigned.
However, it is acceptable that services restricted to access from within the TU Darmstadt network do not require 2FA. This is because access to the TU Darmstadt network itself is generally secured by 2FA or comparable measures (such as device-specific WLAN passwords).
No. The timeout is independent of two-factor authentication (2FA) and is based on other technical and security considerations.
The use of personal devices (such as smartphones) to generate one-time codes for 2FA login is generally permitted.
Students who take electronic examinations (E-Exams) either in the PC pools at TU Darmstadt or on their own devices are requested to have at least one TOTP token available on a second device (e.g. smartphone or hardware token). This token is required to log in before the start of the exam.
If your own token fails during the exam, replacement access is available so that you can continue to participate in the exam.
Further information can be found under Required Credentials on the website of the Center for Educational Development and Technology (HDA).